Vinyl Stickers Lettering Wih Contact Paper'

What Is Vinyl Lettering on Contact Paper and Why It Is So Popular
Vinyl stickers lettering with contact paper refers to individual letter cutouts made of vinyl that are often temporarily mounted on a layer of contact paper to make handling and placement easier. This setup is popular among renters, students, and design enthusiasts because it delivers a polished, professional look without the risks of damaging walls or painted surfaces. The contact paper acts as a transfer sheet that holds all the letters together as one flexible panel, allowing you to slide the entire design into place in a single step.
The appeal of this method lies in its balance between durability and flexibility. Pure vinyl lettering can be tricky to align when you have multiple characters, but adding a contact paper carrier sheet gives you a stable surface to smooth, level, and reposition if needed. This approach works beautifully for nameplates, motivational quotes, menu labels, or branding accents in cafés and boutiques, where a clean, temporary solution is ideal.
Choosing the Right Vinyl and Contact Paper for Your Project
Not all vinyl is created equal, and the success of your lettering project depends heavily on choosing the right type of vinyl and contact paper. For indoor applications, a standard adhesive vinyl with medium tack works well, while outdoor projects require more robust, weather-resistant vinyl that can withstand UV exposure and moisture. The thickness of the vinyl, often measured in gauge, affects how long the lettering will last and how easily it can be removed without tearing.
- Opt for cast vinyl for premium flexibility and a clean, professional finish on complex lettering designs.
- Choose calendered vinyl if you are on a budget and working on simpler, short-term projects.
- Pick a matte or glossy contact paper that complements your vinyl finish to avoid unwanted glare or texture clashes.
When you combine these materials, you gain control over the final look, whether you want a subtle office nameplate or a bold statement across a gallery wall. Testing a small sample of vinyl with your chosen contact paper ensures good adhesion, clean peeling, and no residue left behind on your surface.
Preparing Your Surface and Designing Your Lettering Layout
Before you even think about peeling the backing off your vinyl, it is essential to prepare the surface where the lettering with contact paper will live. Dust, oil, and tiny bumps can prevent the vinyl from sticking evenly, so clean the area with a mild solution and dry it thoroughly with a lint-free cloth. If you are working on a textured wall or an uneven surface, consider using a thin, clear leveling layer or choosing a slightly thicker vinyl that can bridge minor imperfections.
Designing your lettering layout is where your personal style shines through. You can go with classic serif fonts for an elegant vibe, sans-serif for a modern feel, or playful handwritten styles for a creative touch. Use design software or even graph paper to plan the spacing, size, and alignment of each letter before you cut. Keep in mind that very thin lettering may be more challenging to weed and apply when it is combined with contact paper, so balance aesthetics with practicality.

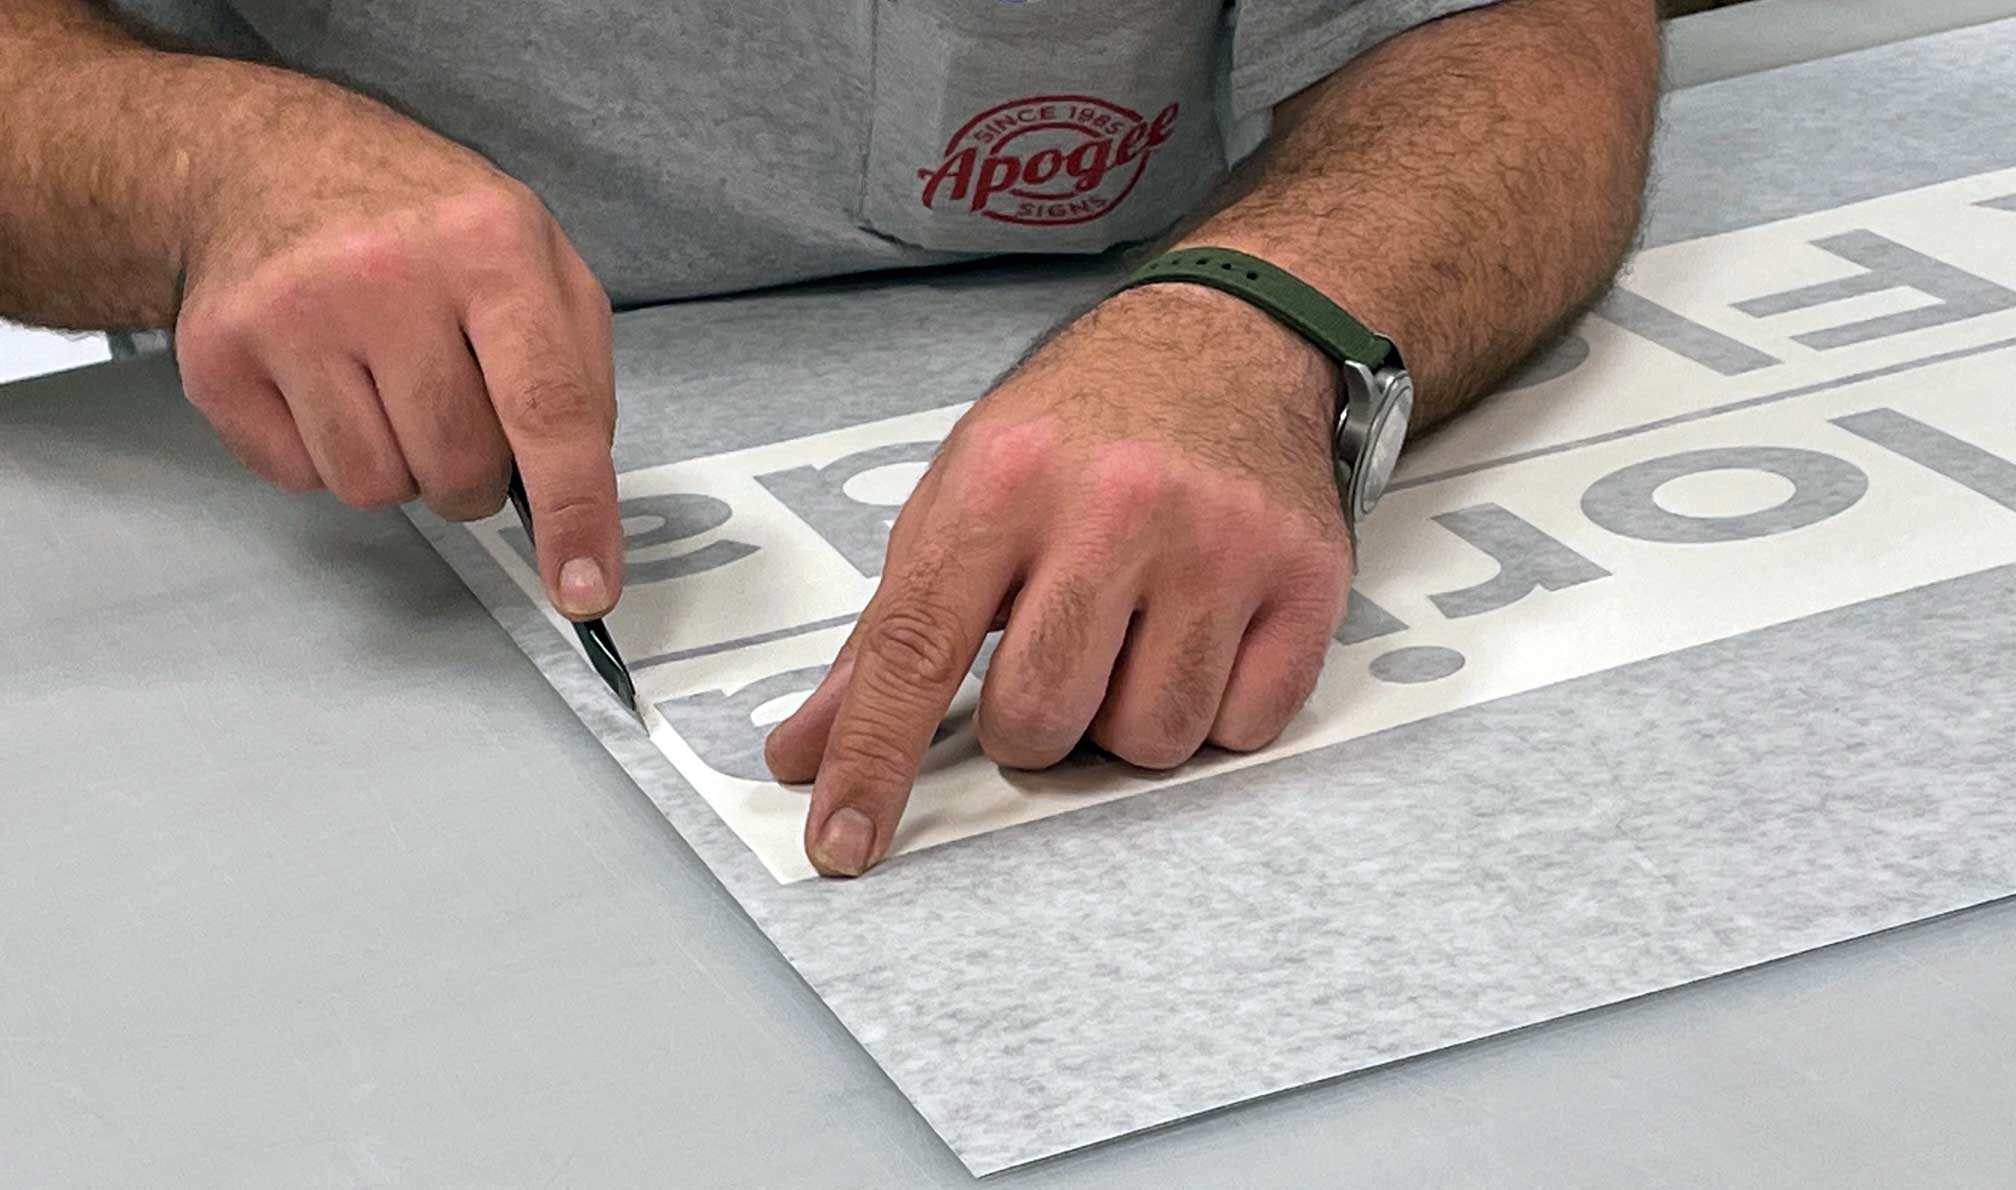
Weeding, Transferring, and Applying Vinyl Lettering with Contact Paper
Weeding is the process of removing the excess vinyl around your letters, leaving only the parts you want to stick to the contact paper. Using a weeding tool or a sharp hobby knife, carefully lift the negative space while keeping the positive letter forms intact. This step requires patience, but taking your time reduces the risk of pulling up parts of your lettering or leaving bits of vinyl behind that will show once the design is installed.
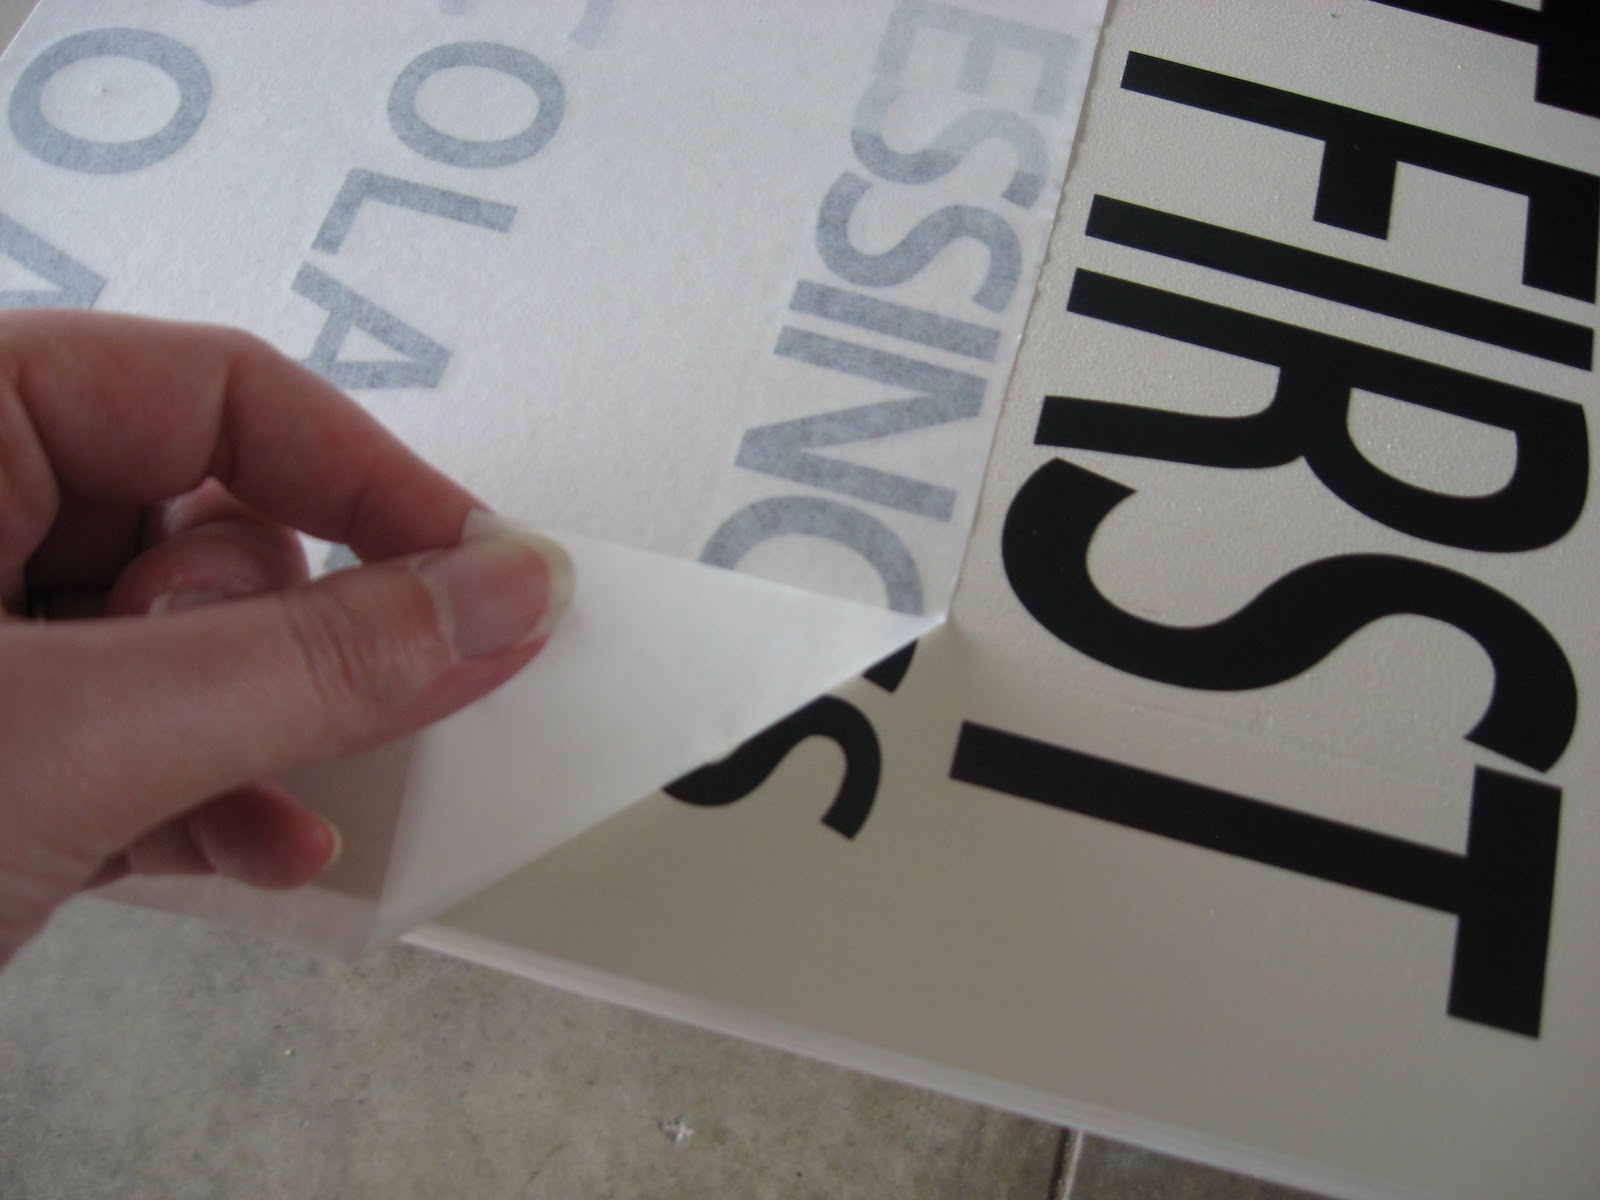
Once weeding is complete, place the contact paper over the vinyl lettering and use a squeegee to smooth out any air bubbles from the center outward. The contact paper should feel tacky enough to hold the letters in place but not so aggressive that it damages the vinyl when you remove it later. After positioning the entire design on your surface, slowly peel away the contact paper at a low angle, using the squeegee to press the letters down as you go. If any letters start to lift, gently press them back down and smooth the area before continuing.
Customization Ideas and Creative Uses for Vinyl Lettering with Contact Paper
One of the best features of vinyl stickers lettering with contact paper is how easy it is to refresh your space without commitment. You can rotate motivational quotes in a home office, swap out seasonal greetings on kitchen cabinets, or update a retail storefront with new promotions in minutes. Because the contact paper backing protects the vinyl, you can even pre-cut entire phrases and store them flat in a drawer, ready for instant deployment when inspiration strikes.
- Create a gallery of small vinyl labels with contact paper for pantry jars and storage containers.
- Use contrasting colors of vinyl and contact paper to make your lettering pop on light or dark surfaces.
- Experiment with layering multiple lines of vinyl stickers with contact paper to build depth and texture in your design.
These creative approaches show that this technique is not just for simple nameplates; it is a versatile design tool for personal expression, event styling, and brand communication. With a little practice, you can master the balance between bold visuals and clean execution, turning any blank wall or shelf into a curated statement.
Maintenance, Removal, and Long-Term Care of Your Vinyl Lettering
Maintaining vinyl stickers lettering with contact paper is straightforward, but using the right cleaning methods helps preserve the adhesive and the appearance of the vinyl. Gently wipe the surface with a mild soap solution and a soft cloth, avoiding abrasive tools or harsh chemicals that can degrade the adhesive or cause the edges to lift. If dust or dirt accumulates around the edges, a quick pass with a dry microfiber cloth usually keeps the design looking sharp.
When it is time to remove the lettering, slow and steady wins the race. Peel the contact paper back at a low angle, using your fingers or a plastic scraper to lift the edges without rushing. In most cases, the vinyl will come off cleanly, leaving only minimal residue that can be removed with a bit of warm water or a gentle adhesive remover. By caring for both the vinyl and the underlying surface, you ensure that you can reuse this technique again and again without worry.
Tips and Tricks for Flawless Results Every Time
Achieving professional results with vinyl stickers lettering with contact paper comes down to preparation, patience, and attention to detail. Before you commit to a large design, test your process on a small piece of scrap material to confirm that the vinyl adverts well to your chosen contact paper and peels off cleanly from your final surface. Pay attention to temperature, because cold environments can make vinyl more brittle, while heat can soften the adhesive too much, causing the letters to stretch during application.
Another pro tip is to work in sections when you have a long phrase, aligning each letter carefully before securing the next segment of contact paper. Use reference lines or light guides on your work surface to keep your lettering level, and do not skip the final smoothing step, which pushes out hidden air bubbles and ensures a flawless finish. With these habits, you will gain confidence and consistency, turning what might seem like a delicate craft into a reliable, repeatable skill that you can use at home, in the studio, or on the job.
In the end, vinyl stickers lettering with contact paper offers a flexible, low-risk way to add personality and clarity to your surroundings. Whether you are decorating a bedroom, labeling a shop, or refreshing a brand display, this method combines the crisp impact of vinyl lettering with the convenience of contact paper for a clean, removable solution that looks professional and lasts through repeated use.

Vinyl Lettering General Installation Instructions
This is a general installation video for vinyl lettering and vinyl decals. Most decals can be installed using this method.
