Vinyl Decal Instructions

Clear and precise vinyl decal instructions help you transform any surface with a professional finish the first time.
Preparing the Surface for Your Vinyl Decal
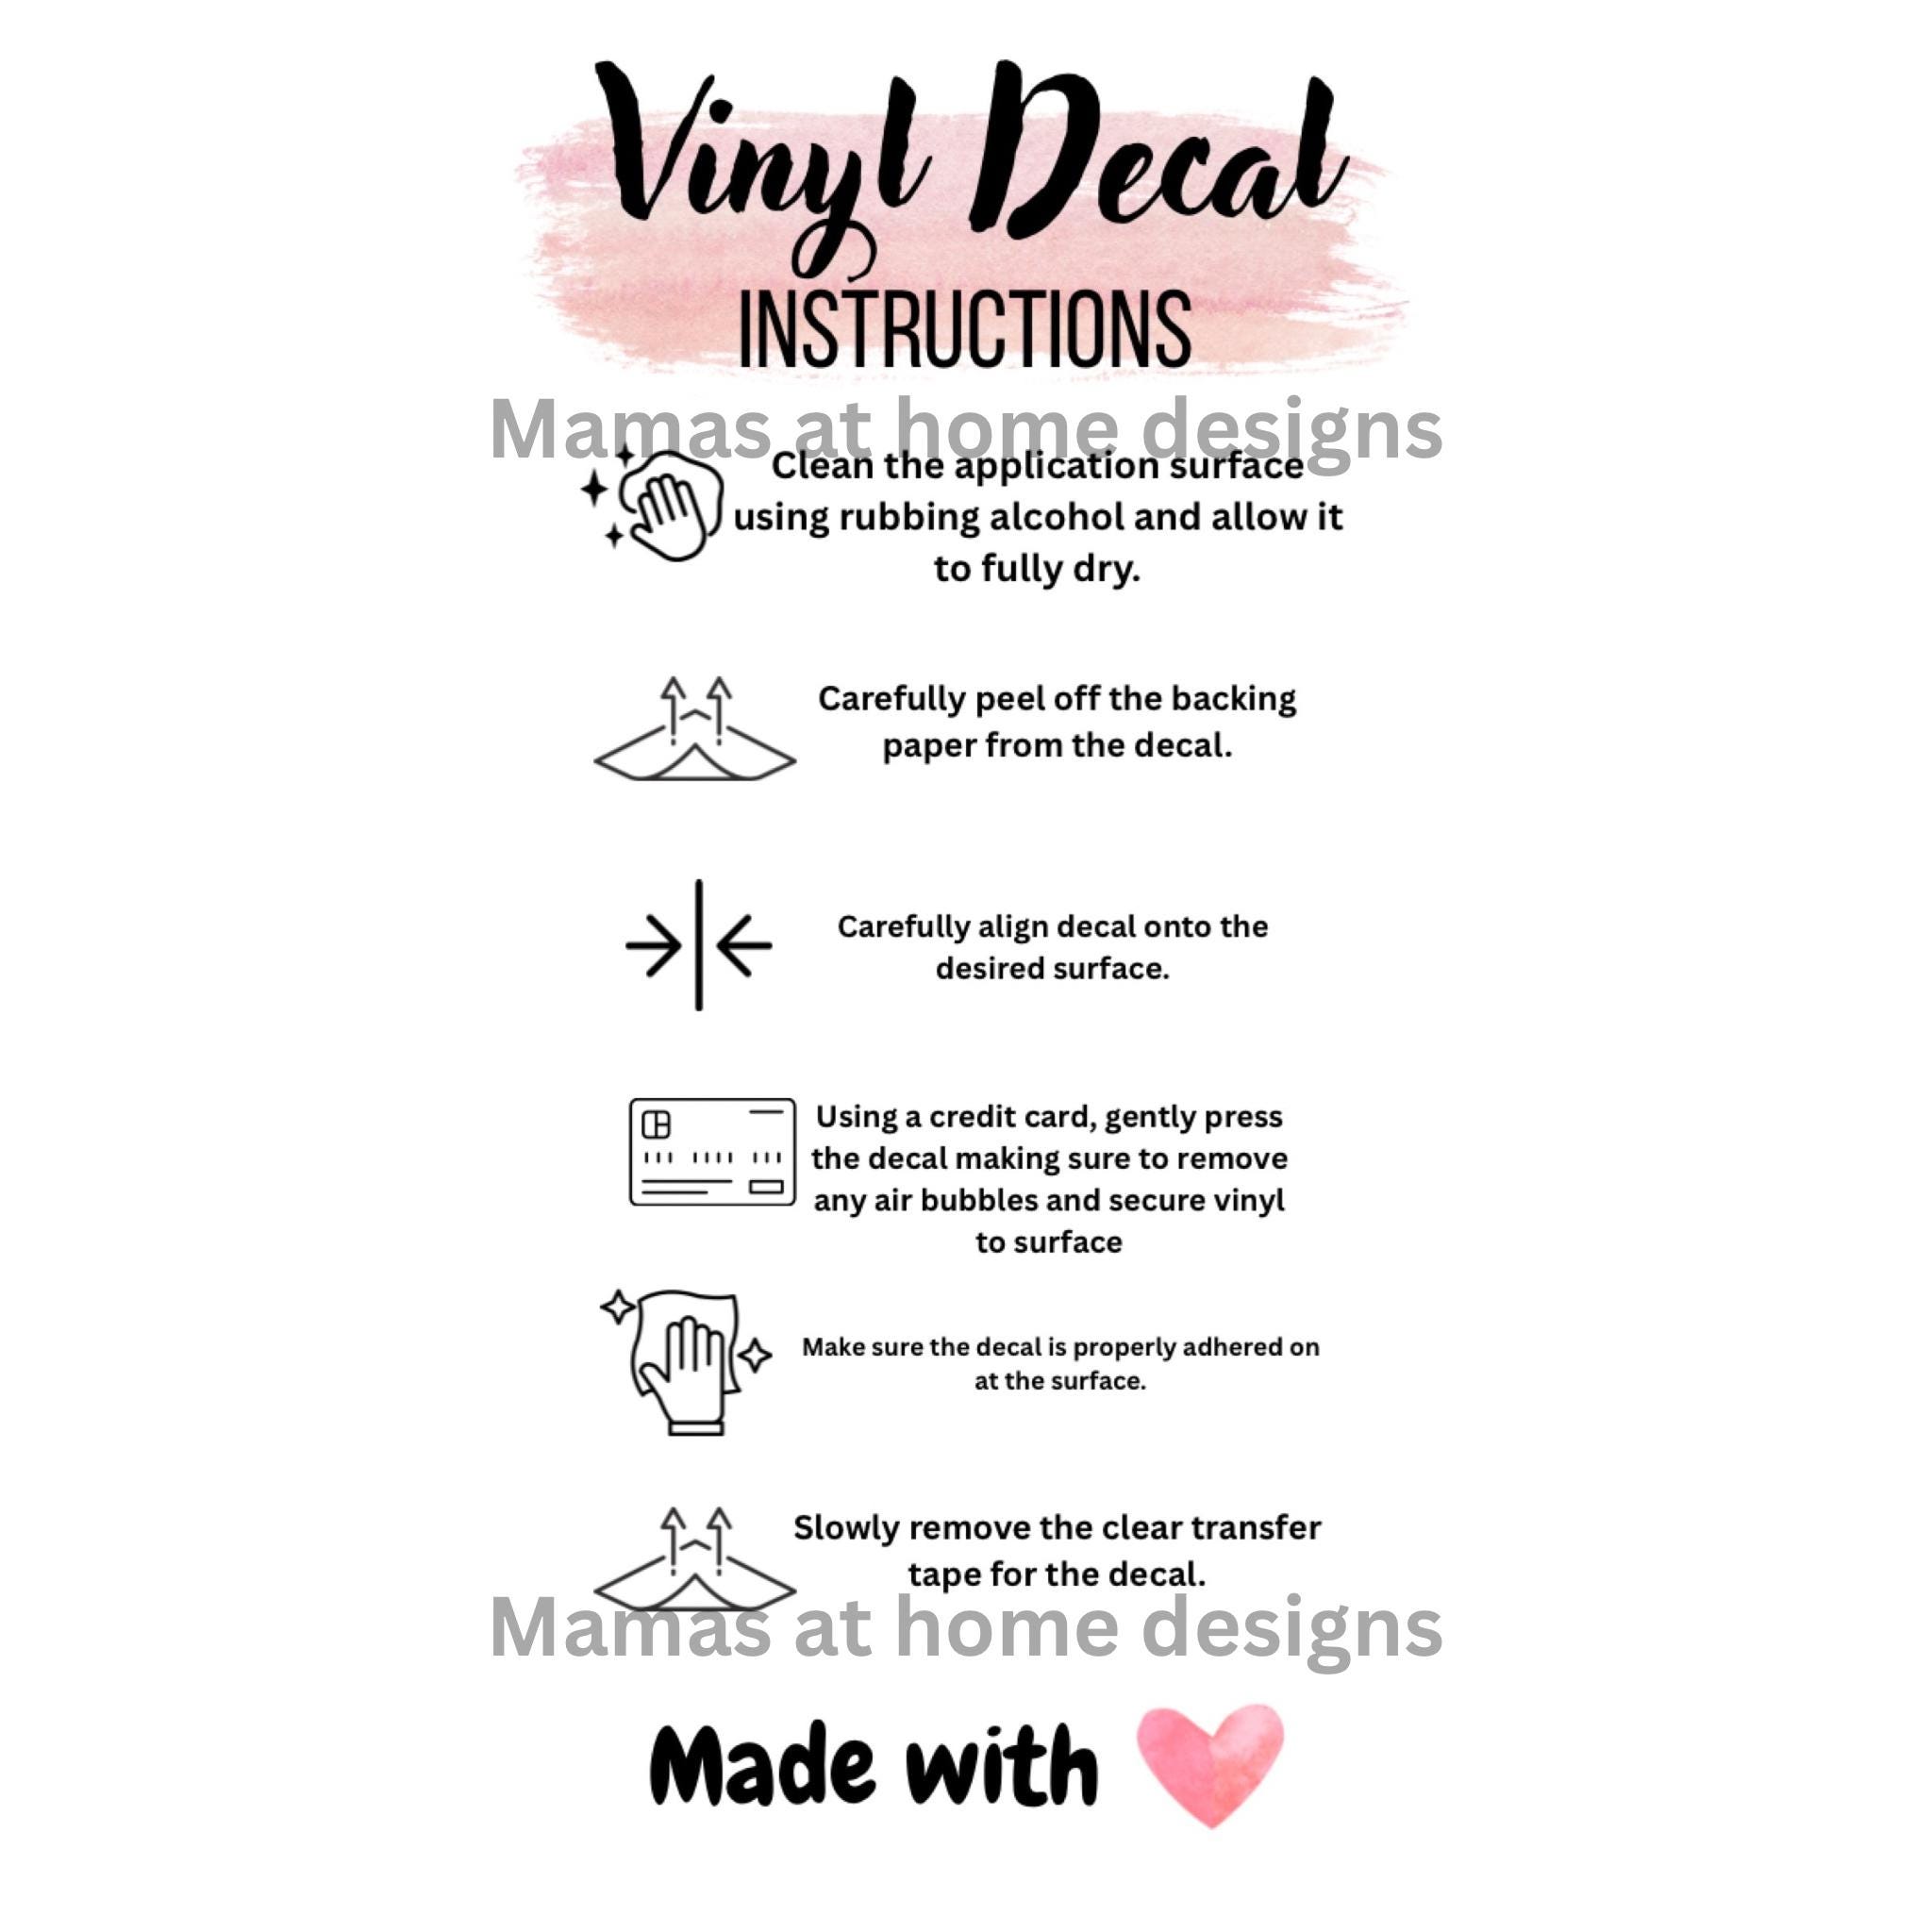
Before applying any vinyl decal, thorough surface preparation is the most important step for long lasting results. Dust, dirt, oils, and residues can prevent the adhesive from bonding evenly, leading to bubbles, peeling edges, or faded appearance over time. Clean the area with isopropyl alcohol or a mild soap solution, rinse thoroughly, and dry completely to ensure a perfectly smooth canvas for your design.
For outdoor applications, choose a surface that is sheltered from constant heavy wear and direct high pressure washing, while indoor environments often provide more stable conditions for delicate graphics. Make sure the surface is completely flat, as deep scratches or uneven textures can compromise the adhesion of the vinyl decal and create weak points along the edges. When you follow these preparation steps in your vinyl decal instructions, you set the project up for a clean installation and a polished look that lasts.
![Vinyl Decal Application Instructions [Free PDF] - The Momma Llama ...](https://i.pinimg.com/originals/0c/58/c6/0c58c67f2abf2922b6ade18809b7caa6.png)
Measuring and Positioning the Decal
Accurate measuring and positioning turns a simple vinyl decal into a intentional design element that enhances the space. Use a tape measure and level to mark the center point, align key edges, and ensure the decal sits straight before any adhesive touches the surface. Many installers find it helpful to temporarily hold the vinyl in place with a removable masking tape at the top corners, allowing a final check of symmetry and height.
Take your time during this stage, because adjusting a vinyl decal after the adhesive has bonded can stretch the material or leave visible residue. If your decal comes with transfer tape already applied, keep the backing in place until you are completely satisfied with the positioning. Thoughtful alignment and careful measurement in this phase reduce waste and make the rest of the vinyl decal instructions much smoother to follow.
Applying the Transfer Tape and Removing the Backing
Applying the transfer tape correctly is a critical step in most vinyl decal instructions, especially for larger or detailed designs. Start from one edge and slowly press the transfer tape down across the surface, using a squeegee or credit card to push out air bubbles and ensure firm contact with the vinyl. If bubbles remain trapped under the transfer tape, they can shift the vinyl pattern or cause incomplete peeling later on.
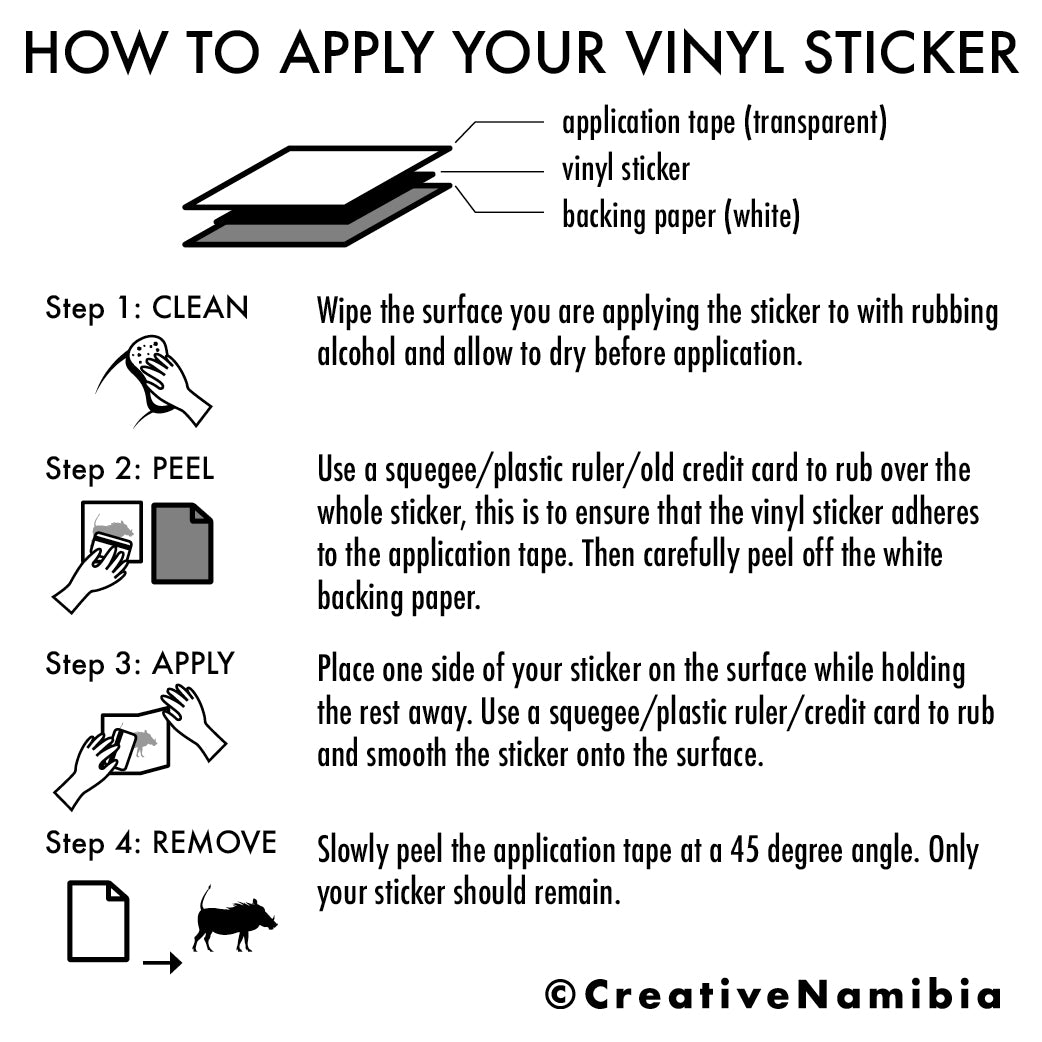
Once the transfer tape is securely applied, carefully peel away the original backing at a sharp angle, watching for any sections that do not stick to the tape. If part of the vinyl stays on the backing, gently press that area back down and repeat the smoothing motion until full adhesion is achieved. A well applied transfer tape acts like a temporary skin, letting you position the entire vinyl decal as one unit while protecting the delicate edges during installation.
Positioning on the Final Surface and Squeegee Technique
With the vinyl decal ready on the transfer tape, align your marked guidelines and gently place the design onto the prepared surface, starting from one end and settling it down slowly. Use a soft squeegee to press from the center outward, moving in overlapping strokes to push out air and encourage the adhesive to bond evenly with the substrate. Consistent pressure and slow movement help prevent wrinkles and keep the vinyl flat, which is essential for a clean professional result.
As you work, periodically check the alignment and lift a corner if needed to verify that the entire decal is seating flat against the surface. Avoid stretching the material or pressing so hard that you distort fine details, especially around thin lines or small lettering. Following careful squeegee technique is a key part of any reliable vinyl decal instructions, because it directly affects durability and visual clarity.

Removing the Transfer Tape and Final Inspection
After the vinyl decal is fully seated, slowly peel the transfer tape back at a low angle, watching for areas that still resist separation due to dust or insufficient pressure during the initial application. If the vinyl starts to lift with the tape, press the affected spot back down and resqueegee that section before continuing to remove the transfer tape. Some intricate designs require a slower, more deliberate peel to keep every element attached to the surface instead of the film.
Once the transfer tape is completely removed, inspect the edges, corners, and detailed areas under good lighting to confirm that the vinyl decal instructions were followed thoroughly. Lightly press any remaining bubbles with a soft cloth or pin, and give the surface time to cure before cleaning or exposing it to harsh conditions. A final careful check ensures that your installation looks sharp, stays intact, and meets the high expectations set by the original vinyl decal instructions.
Long Term Care and Maintenance Tips
Proper long term care extends the life of your vinyl decal and preserves the vivid colors that made the installation worthwhile in the first place. For most surfaces, gentle washing with mild soap and a soft cloth is sufficient, while avoiding abrasive tools or strong chemical cleaners that can degrade the adhesive or printed layer. Outdoor decals benefit from occasional checks for lifted edges, especially after extreme weather events, so you can reapply pressure or touch up areas before small problems become major damage.
By revisiting the core ideas in these vinyl decal instructions and adapting them to your specific project, you gain confidence and skill with each new installation. Whether you are decorating a vehicle, personalizing equipment, or adding interior accents, careful preparation, precise placement, and thoughtful maintenance will keep your vinyl graphics looking fresh and professional for years to come.
Vinyl Lettering General Installation Instructions
This is a general installation video for vinyl lettering and vinyl decals. Most decals can be installed using this method.
