Vinyl Decal Installation
Vinyl decal installation becomes easy when you follow a few simple steps and prepare the surface carefully.
Preparing the Surface for Vinyl Decal Installation
Before applying any sticker, clean the surface thoroughly to remove dust, oil, and grime. Use a mild soap solution and a soft cloth, then dry the area completely to ensure strong adhesion. A well-prepared surface is the foundation of a successful vinyl decal installation and prevents peeling over time.
For smooth surfaces like glass, metal, or painted walls, consider using a light rubbing alcohol wipe to eliminate any remaining residue. This step is especially important in vinyl decal installation because contaminants can create invisible barriers between the adhesive and the surface. Taking a few extra minutes here will save you from rework later.
Measuring and Positioning the Decal
Use a measuring tape to check the width and height of the area, and mark the center point lightly with a pencil if needed. Proper alignment is a key part of vinyl decal installation, especially for logos or text that must look balanced. When in doubt, place the decal temporarily with tape on the top edge to adjust before committing.
Some installers recommend creating a template from paper to test the fit before cutting the actual vinyl. This technique is helpful for large or complex designs in vinyl decal installation, as it reduces waste and improves accuracy. Once you are satisfied with the positioning, you are ready to peel and stick.
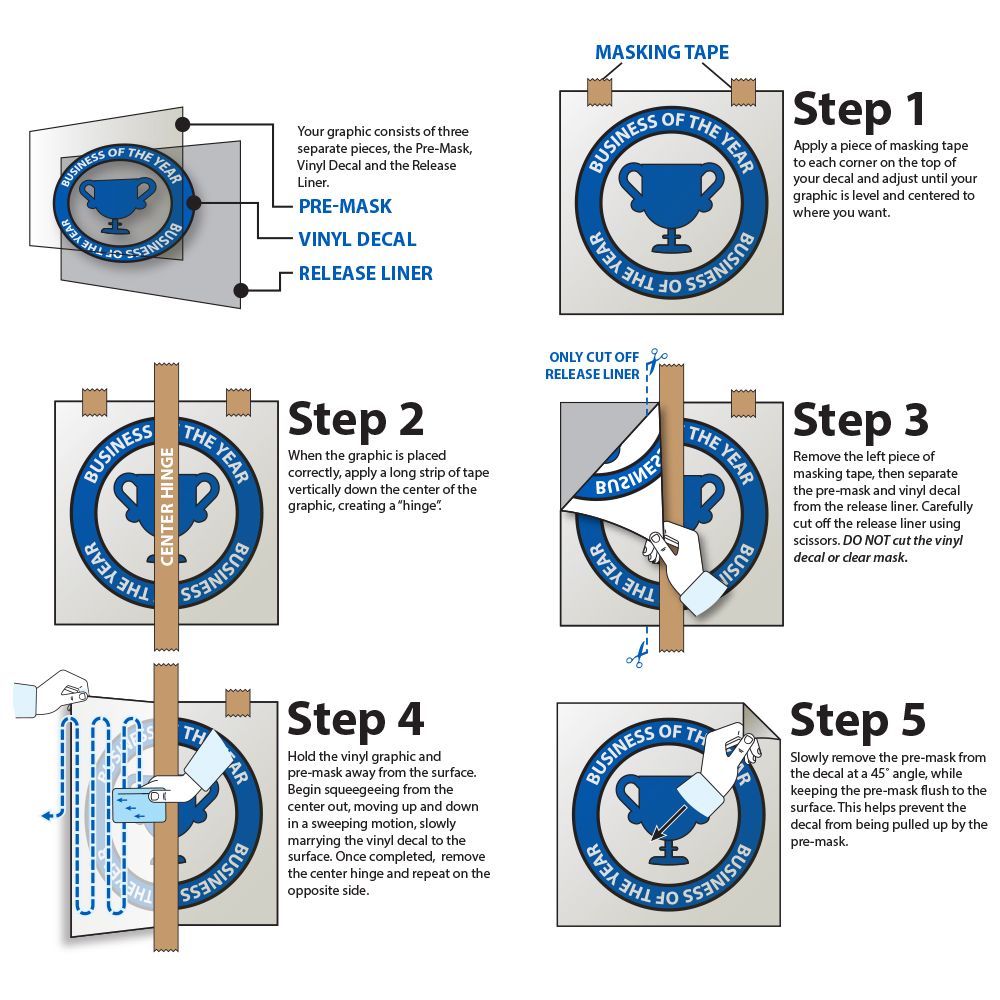
Applying the Transfer Tape
Most vinyl decals come with a protective layer and a sheet of transfer tape to keep the pieces together during application. Carefully apply the tape from the center outward to avoid trapping air bubbles beneath it. A firm squeegee or credit card helps smooth the transfer tape and ensures good contact in vinyl decal installation.

If the decal is large, apply the transfer tape in sections while keeping the vinyl decal installation process manageable. Trim any excess transfer tape from the edges with a sharp utility knife to maintain clean lines. A well-applied transfer tape acts like a temporary skin that moves the entire design intact onto the final surface.
Removing the Backing and Placing the Decal
Slowly peel back the vinyl backing at a sharp angle, checking that the graphic stays on the transfer tape. If parts lift off, press the vinyl down and adjust the angle to prevent premature separation during vinyl decal installation. Working in a dust-free environment reduces the chance of particles sticking to the exposed adhesive.
Position the transferred design on the surface, aligning it with your earlier marks before pressing firmly into place. Start from the center and work outward to push out any trapped air in vinyl decal installation. This careful placement step greatly influences the final appearance and longevity of the decal.

Squeegeeing and Final Adjustments
Use a soft squeegee to press the decal firmly onto the surface, moving from the middle toward the edges to remove remaining air pockets. Consistent pressure during this stage is crucial for professional results in vinyl decal installation, especially on textured or curved surfaces. Inspect the decal from different angles to spot any areas that did not adhere properly.
After the main body is secured, slowly remove the transfer tape at a low angle to avoid pulling up the vinyl. If small sections lift, gently press them back down and smooth them with the squeegee. These final adjustments complete a clean and polished vinyl decal installation.
Tips for Long-Lasting Results
Avoid washing the freshly installed decal for at least 48 hours to give the adhesive time to cure fully. Clean the surface occasionally with mild soap and a soft cloth, but steer clear of harsh chemicals that can degrade the vinyl in vinyl decal installation. Proper care helps the graphic maintain its color and adhesion for years.

For outdoor applications, choose a weather-resistant vinyl decal installation and consider slightly overlapping edges to accommodate material expansion. Regularly check the corners and edges, especially after temperature fluctuations, and gently re-press any lifting sections. Following these tips ensures your vinyl decal installation looks great from the first day to the last.
Conclusion
With careful preparation, precise positioning, and gentle handling, vinyl decal installation can deliver a crisp, durable finish that enhances any surface. Attention to detail at each stage, from cleaning to squeegeeing, makes the difference between a professional result and a messy redo. By practicing these techniques, you can confidently apply vinyl graphics that stay vibrant and firmly attached for a long time.
Apply Vinyl Decals using the Wet Application Method
How to apply vinyl decals using the Wet Application method. This method of vinyl adhesive application allows you to remove air ...
