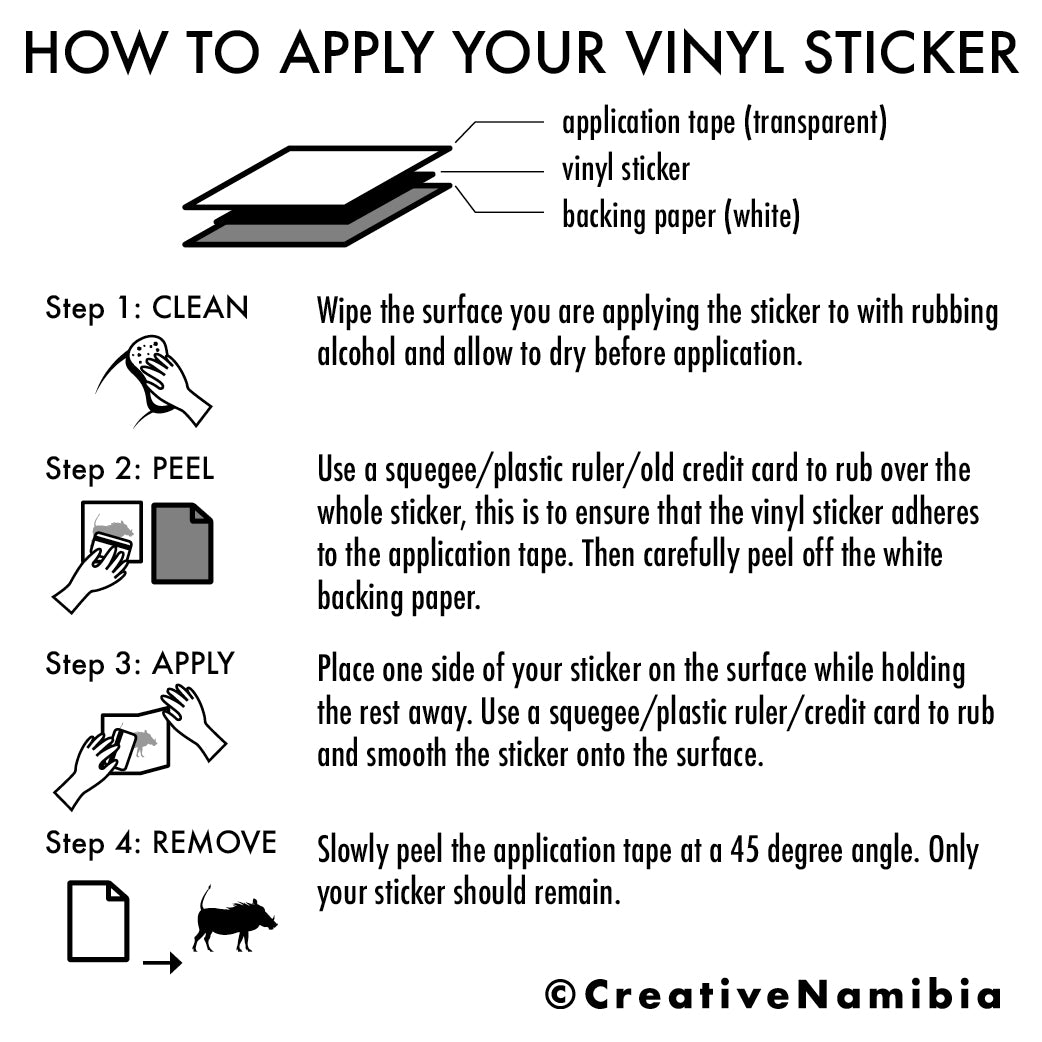
Instructions For Vinyl Decal Application

Applying a vinyl decal can transform any surface when you follow clear vinyl decal application instructions and take your time with each step.
Preparing the Surface and Gathering Tools
The foundation of a flawless vinyl decal application is thorough preparation, so start by cleaning the target surface with a mild soap solution and then rinsing it well. Remove all dust, oils, and residues using isopropyl alcohol and a lint-free cloth, and allow the area to dry completely before proceeding. Gather a soft squeegee, a craft knife or razor, masking tape, measuring tools, and a hair dryer or heat gun, because having these tools ready streamlines the vinyl decal application process and reduces stress.
Choose a smooth, non-porous surface for your first projects, such as glass, metal, or painted walls, since these materials give the adhesive time to settle without tearing. Lay the decal face up on a clean cutting mat, measure the surface, and mark registration points with light pencil lines or low‑tack masking tape to keep everything aligned. When the surface is spotless and your tools are organized, you create the ideal conditions for a precise and confident vinyl decal application that looks professional from every angle.
Cutting and Weeding the Decal Design
Before you begin the vinyl decal application, cut the design from the sheet with enough extra border to handle, using a sharp craft knife and a steady cutting motion. Press firmly enough to slice through the vinyl and liner, but avoid cutting into the transfer tape, and work on a self‑healing mat to protect your table. Once the decal is trimmed roughly to shape, use a weeding tool or the tip of a craft knife to remove the excess vinyl around the design, leaving only the parts you want to transfer.
Pay close attention to small pieces and intricate details, because incomplete weeding is a common reason for a messy vinyl decal application and peeled edges later on. If your design has very fine elements, reinforce them with a few pieces of low‑tack tape so they stay in place when you lift the liner. When every unwanted vinyl has been cleanly removed and the design is ready to transfer, you set the stage for crisp lines and a professional finish that will last.
Applying the Transfer Tape Securely
With the weeded design ready, smooth a sheet of transfer tape over the entire vinyl decal, starting from the center and working outward to push out air bubbles. Firmly press the tape across all details, then use a squeegee or credit card to ensure strong adhesion between the vinyl and the transfer tape for a reliable vinyl decal application. If the decal is large, temporarily secure the transfer tape to the worktable with a few pieces of masking tape to keep everything flat and wrinkle‑free.

Before you move the decal to its final surface, double‑check that every part of the design has stuck to the transfer tape, because partial adherence leads to wasted materials and repeated work. When the transfer tape lies smoothly over the entire image and feels securely bonded, you are ready to position the decal exactly where you want it, knowing that the upcoming steps will be much easier.
Positioning and Squeegeeing the Decal
Carefully lift the vinyl decal by holding the transfer tape, align it with your registration marks or freehand technique, and gently place it onto the prepared surface. Start from one edge and slowly lower the decal while smoothing it down with your hand to avoid folds and misalignment during the vinyl decal application. Once the decal is roughly in place, use a soft squeegee at a low angle to press from the center outward, pushing out air pockets and ensuring intimate contact with the surface.
Work methodically across the entire design, overlapping each pass slightly so that no area is left loose or wrinkled, which is essential for a durable vinyl decal application. If the decal resists placement, carefully lift the edge, reposition it, and continue squeezing out air, because patience at this stage prevents bubbles and lifting later on. A well‑positioned and thoroughly squeezed decal will hold its shape and allow the adhesive to bond evenly with the surface beneath.

Removing the Transfer Tape and Final Smoothing
After the vinyl decal is firmly seated, slowly peel the transfer tape back at a sharp angle, pulling it toward you rather than straight upward to reduce the chance of pieces sticking to the tape. If small sections refuse to release, gently press them back down and use a low‑temperature hair dryer to soften the adhesive slightly, making removal cleaner during the vinyl decal application. Inspect the decal closely for any areas where the vinyl lifted from the surface, and use the squeegee or a soft cloth to re‑press those spots until they feel smooth and secure.
For extra durability, avoid washing or touching the fresh decal for a short period, giving the adhesive time to cure and bond properly. When the transfer tape is completely removed and the edges lie flat, your vinyl decal application will look vibrant, precise, and long‑lasting. With consistent preparation, careful weeding, and gentle yet firm squeegeeing, you can repeat this process on different surfaces and build confidence with every project.
Troubleshooting Common Issues and Long‑Term Care
Even with careful vinyl decal application instructions, you might encounter bubbles, wrinkles, or peeling edges, especially on textured or curved surfaces. To fix small bubbles, gently lift the edge of the decal, re‑apply pressure with the squeegee, and lower the vinyl back down smoothly to release trapped air. For stubborn lifting corners, a tiny amount of repositionable adhesive or a brief application of heat can help the vinyl bond more effectively without damaging the material.

Protect your work by avoiding harsh cleaners, abrasive tools, and sharp objects near the decal, and instead use a soft cloth and mild soap when cleaning. With consistent care and attention during installation, each vinyl decal application becomes a polished finish that enhances walls, vehicles, gadgets, and signage. By mastering these steps and refining your technique over time, you gain the ability to create crisp, professional results that inspire confidence and encourage you to take on bigger projects.
Following detailed vinyl decal application instructions, from surface prep and careful weeding to smooth transfer tape removal and gentle squeegeeing, leads to clean lines, vibrant colors, and lasting adhesion. When you respect each stage of the process, you transform ordinary surfaces into striking displays that hold up well under normal conditions. Keep practicing, enjoy the creative possibilities, and let every new vinyl decal application reinforce the skills that turn simple designs into professional‑looking results.
Vinyl Lettering General Installation Instructions
This is a general installation video for vinyl lettering and vinyl decals. Most decals can be installed using this method.
