How To Put On Vinyl Decal
Applying a vinyl decal can transform any surface, and learning how to put on vinyl decal the right way ensures a clean, bubble-free finish every time. Whether you are customizing a car, laptop, or storefront sign, the process relies on patience, preparation, and the right tools. A well applied vinyl decal sticks smoothly, resists peeling, and looks professional instead of patchy. Follow this guide to understand how to put on vinyl decal projects with confidence and long lasting results.
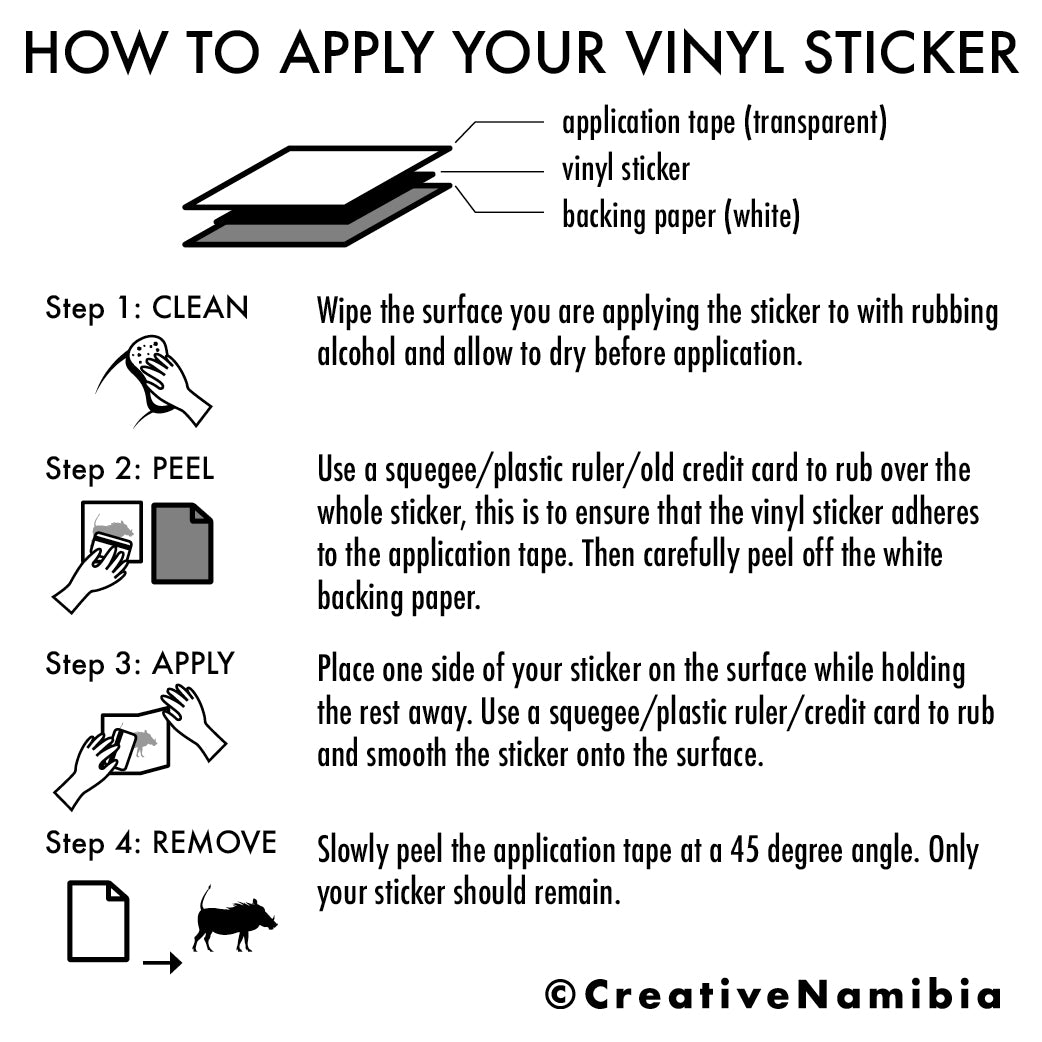
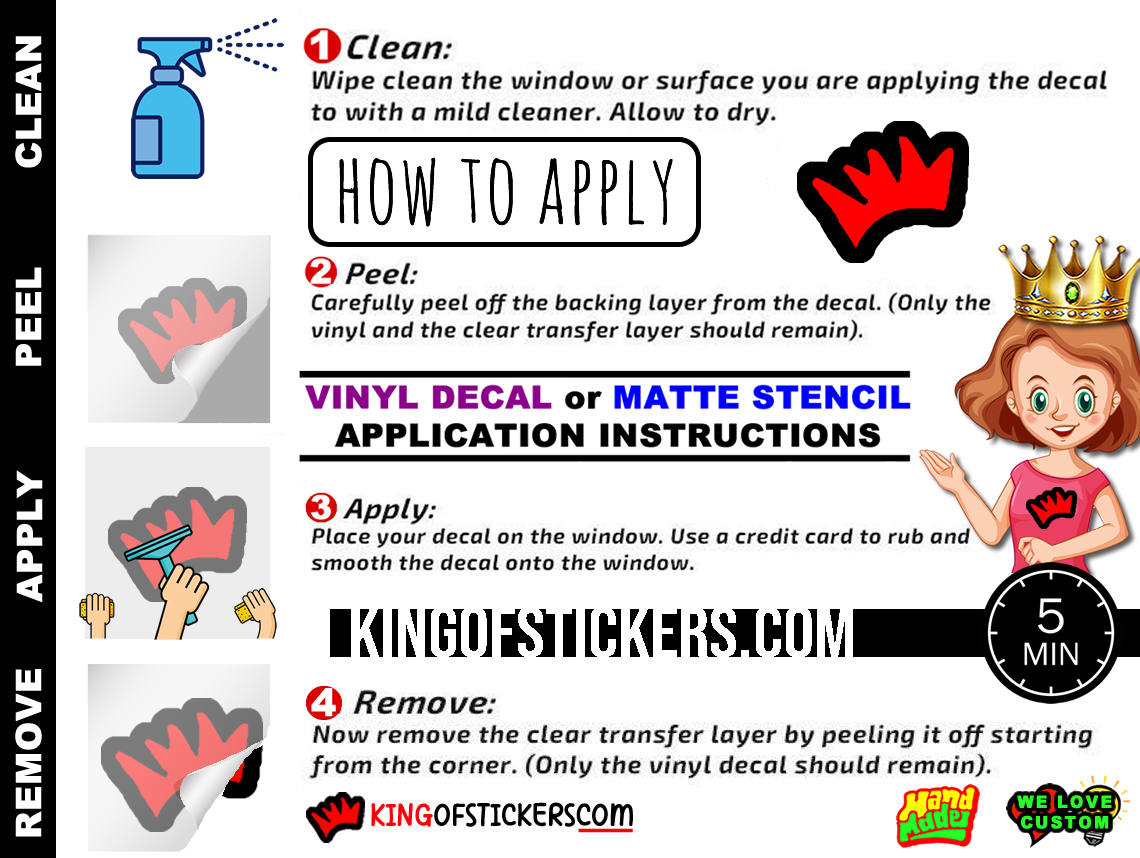
Gather Your Tools and Prepare the Surface
Before you learn how to put on vinyl decal, make sure you have everything within reach. A clean, dry surface free of dust and grease is essential for strong adhesion, so start by wiping the area with isopropyl alcohol or a mild cleaner. Gather a soft squeegee, a measuring tape or ruler, a craft knife or razor for trimming, and masking tape to hold the decal in place temporarily. Microfiber cloths help remove dust, and a spray solution of water plus a few drops of dish soap gives you a temporary slip layer for precise positioning. Having these tools ready makes the whole process smoother and reduces the risk of mistakes.
Surface preparation is a critical step in how to put on vinyl decal, especially on textured or previously painted panels. Check for loose debris, wax, or oily residues, because any of these can prevent the adhesive from bonding evenly. If you are applying the decal on a car door or window, choose a shaded area or work indoors to avoid fast drying of the slip solution. When the surface is truly clean and smooth, the vinyl can conform better to curves and edges, giving your project a professional look from every angle.

Measure, Align, and Position the Decal
One of the key steps in how to put on vinyl decal is careful measurement and alignment. Use a measuring tape to compare the dimensions of the decal with the target area, marking the center points lightly with a soft pencil or masking tape. For larger designs, apply masking tape across the top edge of the decal to keep it from shifting while you adjust the angle. Hold the decal at a slight distance and use a level or ruler to ensure it sits straight, because a crooked start is hard to fix once the adhesive touches the surface.
When you are confident about the placement, gently lower the decal onto the surface, letting gravity do most of the work instead of pressing hard from the start. If your kit includes a transfer tape, keep it on for now, because it protects the vinyl and makes handling easier during alignment. Remember that part of how to put on vinyl decal successfully is taking the time to double check symmetry, spacing, and proportions before committing. Small adjustments made before the adhesive fully bonds save you from peeling and reapplying later.
Apply the Decal Using the Slip Solution Technique
The slip solution method is one of the most reliable ways to learn how to put on vinyl decal without trapping air bubbles. Mix water and a few drops of dish soap in a spray bottle, then mist the surface and the back of the decal lightly. The thin layer of soapy water reduces friction, allowing you to slide the decal into exact position before the adhesive sets. With the decal in place, hold it firmly at one edge and begin pressing from the center outward, pushing excess liquid toward the edges as you go.
Use a soft squeegee in a overlapping stroke motion, working from the middle toward the sides to flatten the vinyl and release trapped water. Avoid aggressive scrubbing, which can stretch or damage the material, and focus on achieving full contact between the adhesive and the surface. As you continue to apply how to put on vinyl decal techniques like this, you will notice fewer bubbles and a smoother finish. The slip solution also helps the decal conform to slight contours, making it ideal for curved doors, pillars, or uneven walls.
Remove the Transfer Tape and Trim Excess Edges
After the vinyl is positioned and flattened, it is time to handle the transfer tape if your decal came with one. Slowly peel the transfer tape back at a sharp angle, ideally at a 180 degree lift, to keep the vinyl layer on the surface. If small pieces stick, gently press them down with the squeegee and peel more slowly, because rushing can tear delicate details. For designs without transfer tape, use a clean squeegee to press the edges firmly, ensuring maximum contact along borders and corners.
Trimming is an important part of how to put on vinyl decal cleanly, especially when the decal overhangs the edge of the surface. Slide a sharp craft knife or razor along the edge of the object, using a metal ruler as a guide to remove excess material. On cars and windows, you may skip trimming entirely if the decal fits perfectly within the existing borders. Always make light, controlled cuts instead of digging deep, so you avoid scratching the underlying surface or cutting into the vinyl itself.

Press, Cure, and Maintain Your Vinyl Decal
Once the vinyl is fully applied and trimmed, applying gentle pressure with a clean cloth or a soft squeegee helps activate the adhesive and improves long term durability. This pressing step is a subtle but valuable part of how to put on vinyl decal, especially on surfaces that experience vibration or wind. For outdoor applications, resist installing in extreme cold, because cold vinyl becomes less flexible and may not conform well to curves. Warm temperatures, on the other hand, can make the adhesive too soft, so aim for moderate conditions for best results.
After installation, allow the decal to cure for up to forty eight hours before washing or exposing it to heavy rain, giving the adhesive time to bond fully. Clean the surface gently with mild soap and a soft cloth, avoiding abrasive scrubbers that can lift the edges. If you ever need to reposition the decal, use a hairdryer on a low setting to warm the vinyl slightly, which makes it more pliable without causing damage. By following these care and application tips, your vinyl decal will stay vibrant, securely attached, and visually appealing for years.
Vinyl Lettering General Installation Instructions
This is a general installation video for vinyl lettering and vinyl decals. Most decals can be installed using this method.
