How To Put Decals On
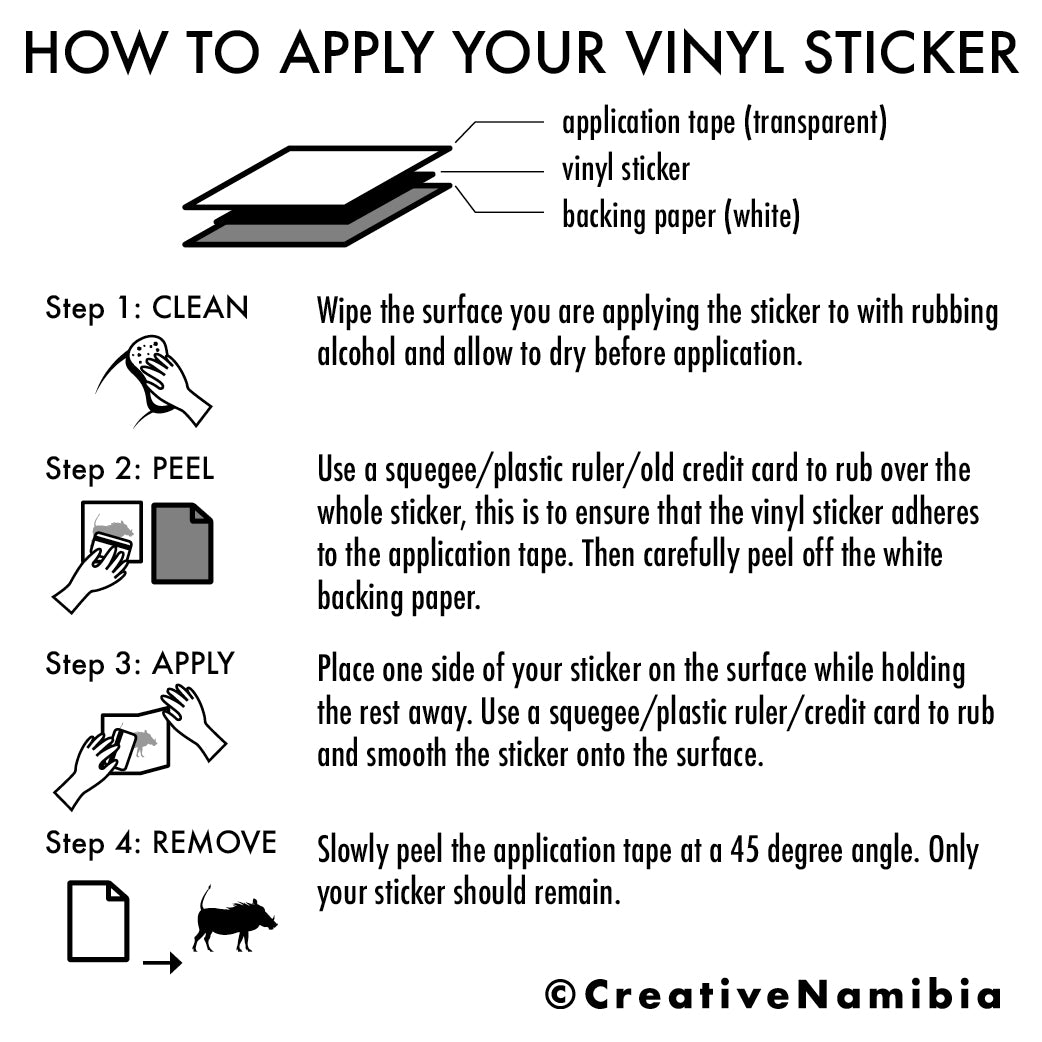
Applying custom decals is a simple way to personalize your gear, vehicle, or walls without permanent changes, and following a few key steps ensures a clean, long-lasting finish.
Preparing the Surface for Decal Application
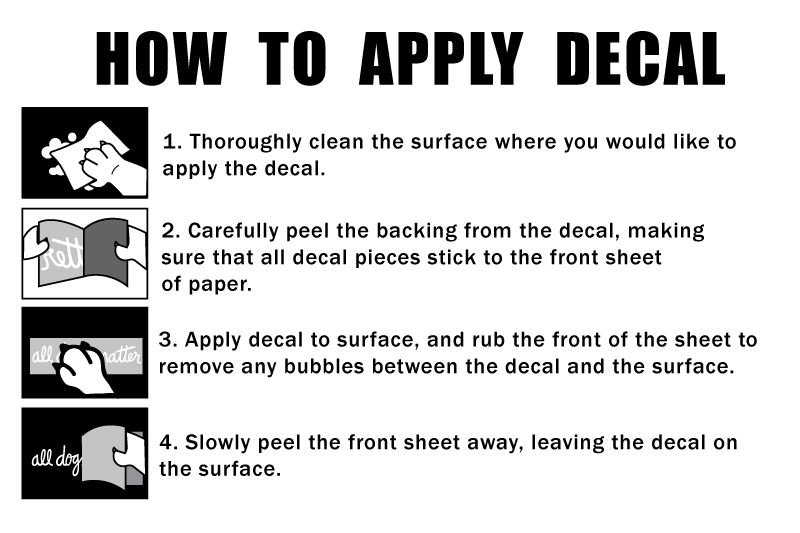
The foundation of a successful installation starts long before you peel the backing, because how to put decals on successfully depends heavily on the condition of the surface. Dust, grease, and tiny bumps can create invisible gaps that lead to peeling, so invest time in cleaning thoroughly with a mild soap and water solution, then dry completely before moving forward. For smooth materials like metal, glass, or painted walls, a little isopropyl alcohol wiped over the area removes residues that might block adhesion, while textured walls may need a light sanding to create a uniform base.
Temperature also plays a critical role, since cold surfaces can make the adhesive brittle and hot surfaces can cause it to set too quickly, so aim for a moderate environment between 15 and 25 degrees Celsius if possible. If you are learning how to put decals on a car door or a curved bumper, pay special attention to sections that flex or stretch, because those areas demand extra cleanliness and a slightly longer pressing time to prevent early lifting. Taking a few minutes to inspect the surface under good lighting and wiping away any remaining particles will save you from having to redo the work later.

Measuring and Positioning the Decal
Before touching the transfer tape, use painter’s tape or removable adhesive dots to temporarily hold the decal in place, allowing you to step back and evaluate how it looks from a distance. This trial stage is essential when you figure out how to put decals on uneven surfaces, because you can adjust the angle to follow a contour or align with a natural seam. Mark reference points with a soft pencil on the surface or on the backing paper, especially if the decal has symmetrical elements that must line up precisely.
For large designs, consider dividing the decal into smaller sections using light guidelines, which makes it easier to maintain consistent spacing and avoid a crooked final result. Remember that slight oversizing during the test phase is better than a misaligned installation, because you can always trim excess later with a sharp hobby knife. Getting the positioning right in this phase dramatically reduces the risk of trapped air bubbles and gives you confidence before the permanent bond forms.
Applying the Decal with a Squeegee
Once you are satisfied with the position, carefully remove the backing paper while keeping the decal supported from below, and gently lay it onto the surface starting from one edge and slowly smoothing outward. A soft squeegee or a credit card becomes your main tool here, helping to press the material down firmly while pushing trapped water and air toward the edges. Use overlapping strokes rather than a single aggressive swipe, because this method minimizes the chance of stretching the material or creating ripples in more delicate designs.

As you learn how to put decals on different materials, adjust the pressure according to flexibility; delicate vinyl may only need light contact, while thicker wall decals can tolerate firmer strokes to ensure complete contact with the surface. If you notice any wrinkles or lifting corners during this stage, pause, lift gently, and re-position rather than trying to force it down, which could damage the adhesive. A slow, patient approach here pays off with a smooth finish that looks professional and free of imperfections.
Removing the Transfer Tape Correctly
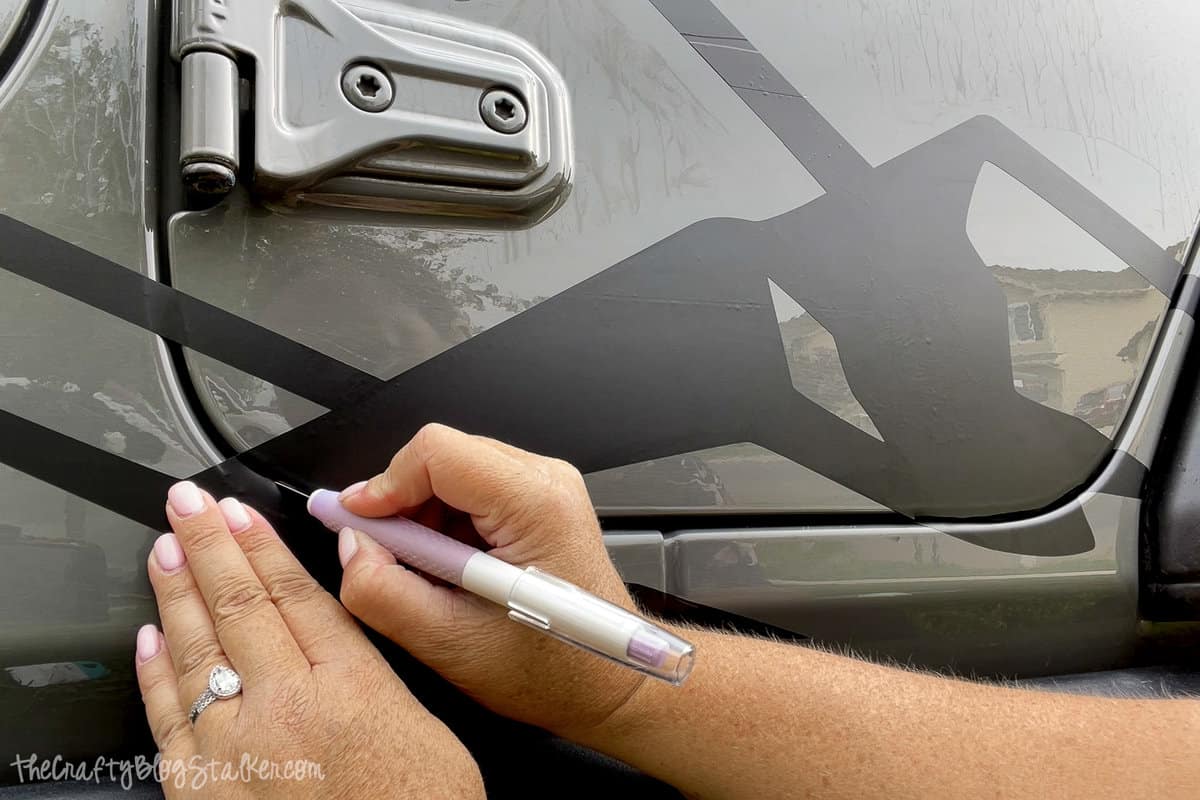
After the decal is fully pressed in place, the next crucial step in how to put decals on is removing the transfer tape without disturbing the fragile vinyl or paint. The goal is to peel at a low angle, almost parallel to the surface, using slow, steady tension rather than a quick, upward rip that could tug the design apart. If the decal has fine details or small pieces, consider using a piece of masking tape pressed lightly over the transfer tape to lift stubborn edges before the final removal.
For tricky areas around corners or textured walls, use the squeegee again to hold the decal in place while you peel, which reduces strain on the adhesive and keeps the lines crisp. Some professionals recommend a partial peel test, where you lift a corner just enough to confirm that the vinyl stays behind, then continue slowly across the rest of the surface. Mastering this stage of how to put decals on ensures that all the effort you spent aligning and smoothing does not unravel at the last moment.
Trimming and Final Touches
Even with careful work, small overhangs or misaligned edges can appear, so a final trim with a sharp hobby knife or precision scissors refines the look and protects against premature wear. Run the blade along the edge of the decal using the surface as a guide, applying minimal downward pressure to avoid scratching the underlying material. If you are working on how to put decals on equipment or tools, rounded corners can reduce the risk of the edges catching on clothing or tools, so consider shaping the design during this step.
Inspect the finished piece under different lighting conditions and from various angles to catch any missed bubbles or lifted sections, which can be gently pushed out with the squeegee or a soft needle. A light coat of compatible sealant may be added in high-wear environments, but always test it on a scrap piece first to confirm it does not cloud the colors or texture. These final touches reinforce durability and complete your understanding of how to put decals on with professional results.
Maintenance and Long-Term Care
To preserve the appearance of your newly applied design, wait at least 24 to 48 hours before cleaning or exposing the surface to heavy use, giving the adhesive time to cure fully. When you do wash the area, use a soft cloth, mild detergent, and avoid abrasive tools that can lift edges or scratch the surface, especially on vehicles and outdoor walls. If you notice small bubbles beginning to form, gentle heat from a hairdryer on a low setting can make the material more flexible, allowing you to press them out before the adhesive sets again.
Understanding how to put decals on also means knowing when to refresh or replace them, because UV exposure and weather can gradually fade colors or weaken the bond. Regular inspections, particularly around corners and seams, help you address minor lifting before it becomes a full separation. With proper installation and ongoing care, your decals will stay vibrant and securely attached, showcasing your style without the commitment of permanent changes.
By following these structured steps and paying attention to detail at each stage, you gain the confidence to apply decals on a wide range of surfaces with reliable, long-lasting results.
How to Apply Decals to a Model
I get great results using this method; hopefully you will too! Good results can still be obtained without decal solution, but I'd ...
