How To Put Decal On

Applying a decal can transform a plain surface into a personalized statement, and learning how to put decal on correctly ensures a smooth, bubble-free finish every time. Whether you are customizing a vehicle, decorating equipment, or adding character to walls, the process relies on preparation, patience, and the right technique. A well-applied decal adheres cleanly, resists peeling, and maintains vibrant graphics, while a rushed job often leads to misalignment or trapped air. This guide walks you through each stage, from surface cleaning to final sealing, so you can achieve professional results on the first try.
Preparing the Surface for Decal Application
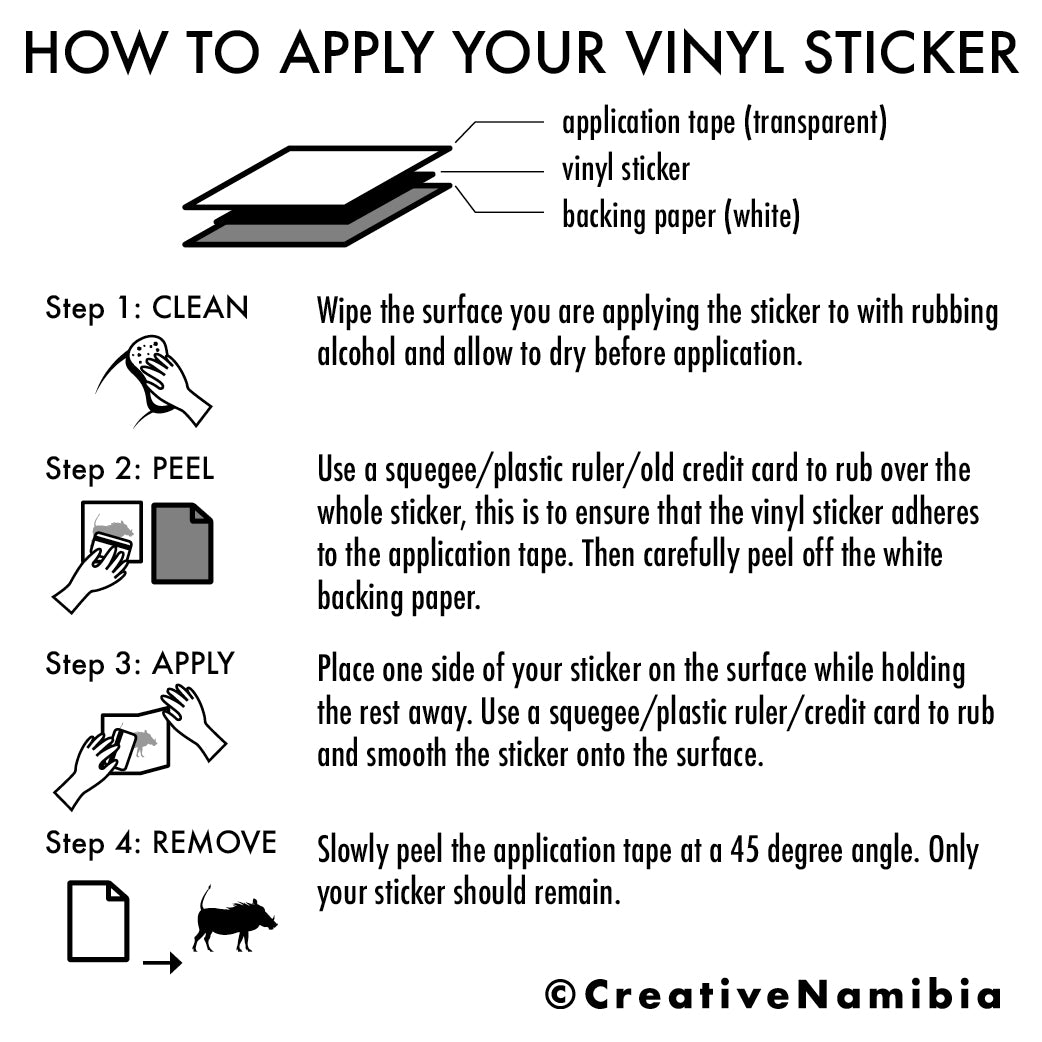
The foundation of how to put decal on successfully starts long before the decal touches the surface. Clean, dry, and smooth substrates allow the adhesive to bond evenly, reducing the risk of early failure. Dust, grease, or old decals create weak spots, so use a mild detergent solution and a soft cloth to remove contaminants, then rinse thoroughly and let the area air dry. For painted surfaces, a light wipe with isopropyl alcohol can eliminate remaining oils and improve adhesion without damaging the paint.
Temperature plays a critical role in how well a decal applies and sets. Ideally, work in a shaded area with a moderate temperature, because heat can make the material too stretchy while cold can stiffen the adhesive. If the surface is porous, such as raw wood or unsealed concrete, consider applying a clear sealer first so the decal bonds to the sealer rather than being absorbed unevenly. Taking time to inspect the surface for scratches or rough spots allows you to smooth or fill them ahead of placement, giving you a cleaner final look.
Measuring and Positioning the Decal
Proper alignment is essential when you learn how to put decal on intricate designs or large logos, and measuring carefully prevents the need for premature rework. Use a tape measure to find the center point of both the decal and the intended location, marking them lightly with a pencil or low-tack tape. For multiple components, such as side panels or cabinet doors, temporarily sketch reference lines on the surface to maintain consistent spacing. Dry-fitting the decal without removing the backing helps you confirm proportions and orientation before committing.
Lighting and angle affect how well you can judge placement, so move around the object and check the decal from several viewpoints. If the design has symmetrical elements, align them with edges or seams on the surface for a balanced appearance. When working on curved or uneven terrain, consider bending the decal gently along its printed lines to preview how it will conform. Marking registration points with small crosses or dots on the surface gives you reliable guides once the transfer tape is in place.
Applying Transfer Tape and Removing the Backing
Transfer tape acts as a temporary carrier that keeps all the pieces together during application, which is a key step in how to put decal on complex graphics. Start by cutting a piece of transfer tape slightly larger than the decal, and smooth it from the center outward to eliminate trapped air. Firmly press the tape onto the decal so it adheres to the entire surface, then double-check that no sections have folded or wrinkled. Slowly peel back the original backing at a sharp angle, watching for areas that might stick to the liner; if they do, gently press them back down and smooth again.

As the backing comes off, inspect the decal for any parts that refuse to release or that stretch unexpectedly. A slow, controlled peel reduces the chance of tearing delicate letters or detailed emblems. If the decal is large, have a second person ready to support the transfer tape so the weight does not pull it off the liner prematurely. Keeping the exposed adhesive clean and free from dust at this stage ensures that the decal will stick reliably when you finally position it.
Positioning and Squeegeeing the Decal
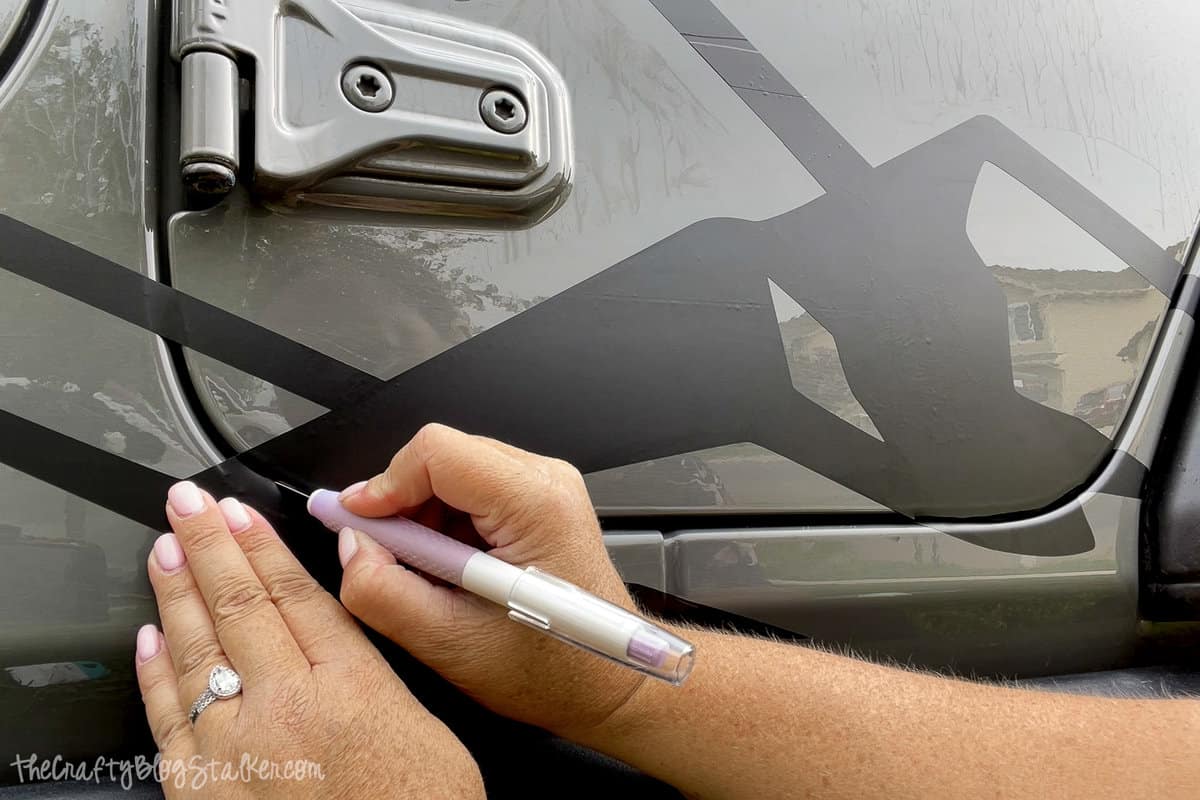
Positioning is where precision meets patience, and it directly answers the question of how to put decal on without misalignment. Hold the decal-transfer tape unit close to the target location, then lower it gradually, letting gravity and your guides lead rather than forcing it down. Once the edges are aligned, begin smoothing the decal from the center toward the edges, pushing out air and excess liquid adhesive as you go. A soft squeegee or credit card works well for this, as it flexes enough to follow contours without scratching the material.
Work methodically in sections, overlapping each pass slightly to ensure complete contact. On graphics with sharp corners, gently lift and re-position if necessary before the adhesive fully sets, which usually happens within a few minutes. For outdoor applications, wind can be a nuisance, so use light weights or temporary tape on loose edges until the decal is secured. Avoid pressing so hard that you distort the design, but apply firm, even pressure to achieve a professional bond.

Trimming, Sealing, and Long-Term Care
After the decal has dried, examine the edges for any overhang or incomplete adhesion, and trim excess material with a sharp hobby knife guided by a steady hand. Carefully lift the edge of the decal and cut along the contour of the surface, then press the seam down once more to prevent lifting. Applying a compatible topcoat or sealant can enhance durability, especially on surfaces exposed to weather, chemicals, or frequent contact. Follow the manufacturer’s recommendations for drying time, as some adhesives require curing before they reach maximum strength.
Long-term success depends on ongoing care, which is an important part of how to put decal on with lasting results. Clean the surface with mild soap and avoid abrasive tools that might lift edges or scratch the graphic. If the decal shows signs of wear, address small lifting areas by pressing them back down and, if needed, applying a thin layer of adhesive designed for the material. By respecting these steps, your decal will remain vibrant and securely attached for years to come.
Mastering how to put decal on transforms a simple sticker into a durable, high-quality finish that looks as good years later as it did on day one. With careful preparation, precise positioning, and gentle yet firm application, you can tackle projects ranging from simple equipment labels to full vehicle wraps. Consistent technique, attention to environmental factors, and a willingness to take your time all contribute to professional-looking results. By following these steps, you gain the confidence to apply decals cleanly, efficiently, and with lasting impact.
How to Apply Decals to a Model
I get great results using this method; hopefully you will too! Good results can still be obtained without decal solution, but I'd ...
