How To Install Vinyl Stickers

Installing vinyl stickers the right way is easier than you think if you follow a few simple steps and take your time to prepare the surface.
Gather tools and prepare the surface
Before you start applying vinyl stickers, collect the right tools and make sure the surface is clean and ready. You will typically need the vinyl sticker itself, a soft microfiber cloth, mild soap or isopropyl alcohol, a spray bottle with soapy water, a squeegee or credit card, a utility knife or cutting tool, and a measuring tape or ruler. Clean the surface thoroughly to remove dust, grease, and fingerprints, because any debris trapped underneath will prevent a strong bond. For best results, wipe the area with isopropyl alcohol and let it dry completely before moving to the next step.
Choose a smooth surface such as glass, metal, painted walls, or finished wood, and avoid extremely dusty or humid environments. If you are working outdoors, shield the area from strong wind so the sticker does not fold onto itself or collect dirt. Position the sticker near the spot where it will go so you do not have to remove the backing and stretch it across a large distance. Taking a few extra minutes to prepare the surface reduces the chances of bubbles, wrinkles, and early peeling, giving your vinyl stickers a clean, professional look from the start.
Measure, align, and position the sticker
Accurate measurement and alignment are essential when you install vinyl stickers, especially if you are covering a large area or placing several stickers in a pattern. Use a measuring tape or ruler to mark the center point or key reference lines on the surface, and lightly pencil a guide if needed. Carefully measure the sticker and compare it with the intended location, adjusting your marks until everything looks balanced. If the sticker has a clear top layer or liner, you can also use the exposed surface as a visual guide to fine tune your alignment before committing.
When you are ready, peel back only a small section of the backing to expose the adhesive edge, and gently press that part onto the surface at your chosen starting point. Use your fingers or a soft cloth to anchor the sticker while you slowly remove the rest of the backing, keeping the vinyl flat and avoiding twists. If the sticker has a transfer tape on top, leave it in place for now, because it will help you slide and adjust the vinyl stickers without damage. This careful positioning stage is your last chance to correct angles and ensure the final result looks exactly how you envisioned.
Apply soapy water for sliding and bubble removal
For larger or detailed vinyl stickers, spraying a light layer of soapy water onto the surface before full contact makes installation much more forgiving. Mix a few drops of mild dish soap into a spray bottle filled with water, then mist the area evenly so it feels slick but not dripping wet. The thin layer of water acts as a temporary lubricant, allowing you to slide the sticker into perfect position and push out trapped air without scratching the adhesive.

With the soapy surface ready, place the sticker and gently lay it down from one side to the other, using a squeegee or soft cloth to press it down gradually. As you work from the center toward the edges, you will see the soapy water begin to escape, and you can guide any remaining bubbles toward the nearest edge. Avoid pressing so hard that the sticker stretches out of shape, and instead use smooth, overlapping strokes that encourage the vinyl to stay flat against the surface.
Squeegee out water and secure the adhesive
Once the vinyl sticker is in position, it is time to replace the soapy water with firm, even pressure so the adhesive bonds properly. Starting from the center and moving outward, run a squeegee or plastic card across the surface in steady strokes, pushing water out from under the sticker. Wipe the squeegee frequently with a clean cloth so you are not just spreading dirty water across the surface. As the water disappears, you will feel more resistance, which is a sign that the adhesive is making solid contact with the material underneath.
Pay special attention to corners, edges, and small details, because these areas are most likely to hold pockets of water if you rush the process. Firm pressure along the edges also helps seal the vinyl stickers against moisture and lifting, which improves durability over time. If you notice any persistent bubbles, carefully lift the edge with your fingernail or a soft cloth, reapply a tiny amount of soapy water if necessary, and then squeegee again until the bubble is gone. Patience during this stage dramatically reduces the risk of peeling later on.

Trim excess and finish the edges
After the main body of the sticker is firmly attached, you will often have excess material around the edges that needs to be trimmed for a crisp finish. Use a sharp utility knife or a precision cutting tool, and drag the blade along the surface of the sticker using the edge of the object as a guide. Make sure your cutting angle is slightly tilted inward so you do not slice into the underlying surface or leave a raised border. Work slowly and make multiple light passes instead of forcing the knife, which helps you maintain control and avoid jagged lines.
For decorative borders, rounded corners, or intricate shapes, consider using small scissors or a craft knife to refine the outline before you remove the transfer tape. When the excess is trimmed and the edges are smooth, gently run your fingers or a soft cloth along the perimeter to ensure complete contact. If your vinyl stickers include a protective top layer or transfer tape, now is the moment to peel it away slowly, starting from one corner and moving across the surface. Removing the tape at a sharp angle rather than straight up reduces the chance of pulling up parts of the vinyl with it.
Protect and maintain the finished installation
Once your vinyl stickers are fully installed and trimmed, a little ongoing care will keep them looking vibrant and prevent premature wear. Avoid using abrasive cleaners or rough scrubbers, and instead clean the surface with a mild soap solution and a soft cloth to preserve the adhesive and the printed colors. If the stickers are exposed to direct sunlight for long periods, choose vinyl materials that are rated for UV resistance, or periodically check the edges for signs of lifting so you can press them back down early.

For surfaces that experience frequent touch or movement, such as doors, appliances, or vehicle panels, inspect the edges of the vinyl stickers every few weeks and gently press any areas that feel loose. If you ever need to reposition or remove the stickers, applying a little heat from a hairdryer on a low setting can soften the adhesive and make removal cleaner without damaging the underlying surface. By following these installation and care steps, you can enjoy a professional, long lasting finish that highlights your design and keeps your vinyl stickers looking great for years.
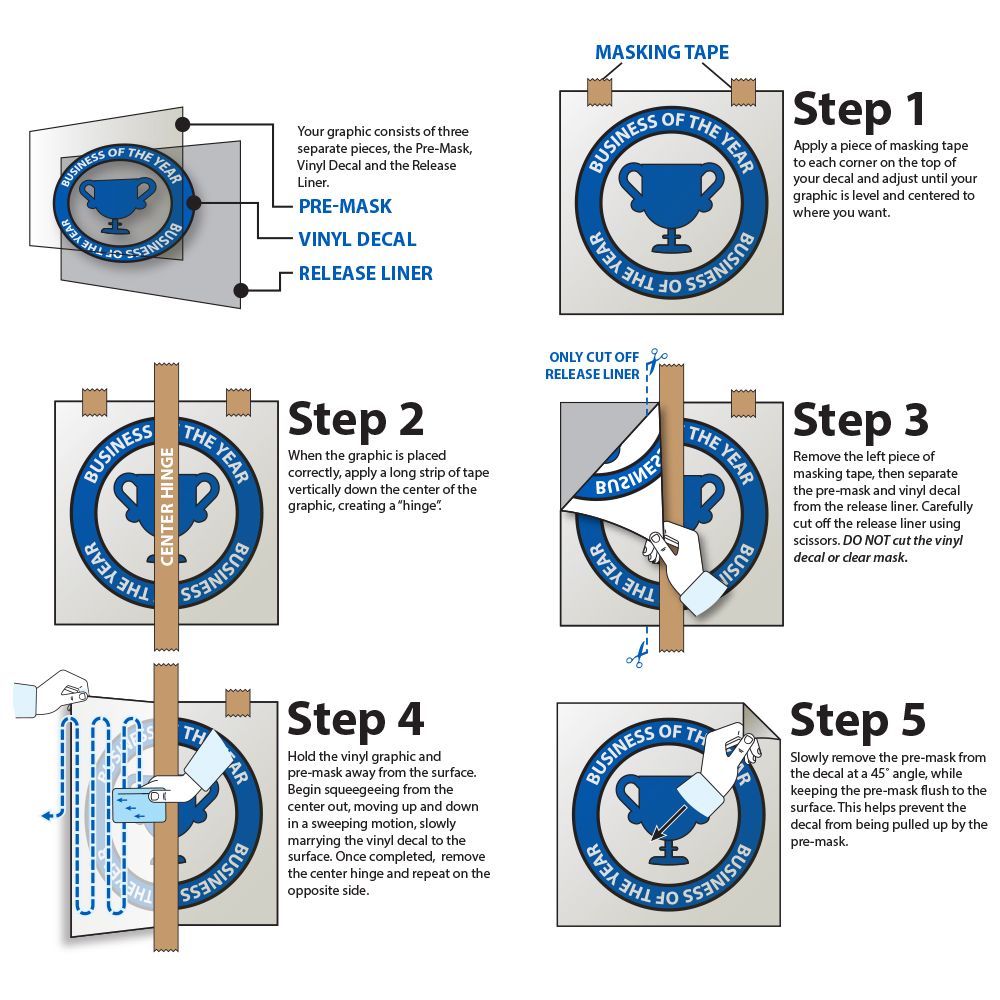
How to apply large vinyl decals, tutorial
Best vinyl stripe selection and quality: Amazon - https://www.amazon.com/dp/B083F62H71/ref=hnd_dp_smp_text eBay- ...
