How To Install Vinyl Decals
Installing vinyl decals is easier than it looks if you follow a few simple steps and take your time.
Choose the Right Surface and Prepare It
The first step to a clean, long lasting install is choosing the right surface for your vinyl decals. Ideal surfaces are smooth, clean, dry, and non porous so the adhesive can form a strong bond without trapped air or dust. Examples include painted walls, glass, metal, finished wood, plastic, and most hard plastics on vehicles.
Before you peel the backing, thoroughly clean the area with isopropyl alcohol or a mild soap solution and dry it completely. Remove dust, oil, and wax because any residue can prevent the vinyl from sticking evenly. If you are applying outdoors, wait for calm dry weather so debris does not settle on the adhesive while you work.

Tips for Tricky Surfaces
- For textured walls, consider whether the decal will mostly stay flat; deep roughness can cause lifting at the edges.
- On car bumpers, avoid installing over heavily damaged or flexing areas that could cause the vinyl to crack over time.
- Test adhesion on a small hidden spot first if you are working with an unusual material or old paint.
Gather Your Tools and Measure Carefully
Having the right tools on hand makes the difference between a frustrating struggle and a smooth application. You will typically need a measuring tape, a level, a soft squeegee or credit card, a razor blade or utility knife, and masking tape for temporary positioning.
Measure the surface and the decal several times so you know exactly how it will fit. If the vinyl decal is larger than the area, plan where you will place the center point first and mark gentle guidelines with a light pencil or low tack tape. Accurate measuring reduces wasted material and helps the final result look professional.
Optional but Helpful Accessories
- Microfiber cloth for wiping down the surface.
- Application or transfer tape if the decal comes on a separate sheet.
- Hairdryer or heat gun on low setting for stubborn corners.
- Sharp craft knife with a fresh blade for clean trimming.
Position the Decal Without Sticking It Down
Many installers prefer to position the vinyl decals loosely before committing to a permanent bond. Peel back only a small section of the backing and align the decal on the surface, using a level or measuring marks to keep it straight.
Use small pieces of low tack masking tape to hold the edges in place while you verify the position from different angles. This stage is your safety net, allowing you to adjust before the adhesive touches the surface permanently.

Common Positioning Mistakes to Avoid
- Avoid stretching the vinyl too much to fit, because tension can distort the shape or cause curling later.
- Make sure text and graphics are readable and not mirrored unless the design intentionally calls for it.
- Double check that the decal is not twisted or folded before you move to the next step.
Apply the Decal and Remove the Backing Gradually
Once the placement is perfect, it is time to secure the vinyl decals firmly. Start from the center and slowly lower the decal onto the surface, pressing gently with your fingers to encourage the adhesive to make contact. Work from the middle outward to push out trapped air.
As the vinyl sticks, peel away the backing at a sharp angle while smoothing the applied section with a soft squeegee or credit card. The squeegee helps press out bubbles and ensures good contact, especially on larger designs. If small bubbles appear, lift the edge of the decal slightly and re squeegee the area until they move out.
Techniques for Different Shapes
- For curved surfaces, apply heat gently to make the vinyl more flexible before smoothing.
- For detailed lettering, use a soft needle or awl through the transfer tape to guide out air pockets.
- For large panels, work in sections so the adhesive does not set before you can adjust.
Trim Excess Material and Final Inspection
After the vinyl is fully adhered, use a sharp utility knife or craft blade to trim any overhanging pieces cleanly. Hold the blade at a shallow angle against the edge of the surface to avoid gouging the material underneath.

Run your hand lightly over the decal to confirm that all edges are down and there are no hidden lifted corners. If you notice any remaining bubbles, carefully lift the edge, reapply pressure with the squeegee, and smooth the area back down. A final wipe with a clean microfiber cloth leaves the surface looking crisp.
Post Installation Best Practices
- Wait at least twenty four hours before washing or heavily stressing the decal if possible.
- Avoid harsh chemicals or abrasive cleaning near the edges in the first few days.
- Check periodically at the corners, especially on vehicles that vibrate often, and gently press down any lifting sections.
Troubleshooting Common Issues
Even with careful preparation, you might encounter bubbles, edge lifting, or cloudy adhesive residue. Small bubbles can often be moved toward an edge and pressed out; if they persist, a tiny pinprick followed by smoothing can release the trapped air.
If edges start to lift over time, a gentle application of heat from a hairdryer can reactivate the adhesive and help the vinyl conform again. For stubborn residue left by old decals or transfer tape, use a mild adhesive remover or isopropyl alcohol on a soft cloth, then rinse and dry thoroughly.

Practice Makes Perfect for Every Project
Installing vinyl decals becomes much easier with practice, and each surface teaches you something new about alignment, stretching, and adhesion. Start with simpler shapes on low risk surfaces before moving to intricate vehicle graphics or large wall installations.
By preparing the surface, measuring carefully, positioning loosely, applying smoothly, and finishing with clean edges, you can achieve professional looking results on your own. With patience and attention to detail, your decals will stay vibrant and securely attached for a long time.
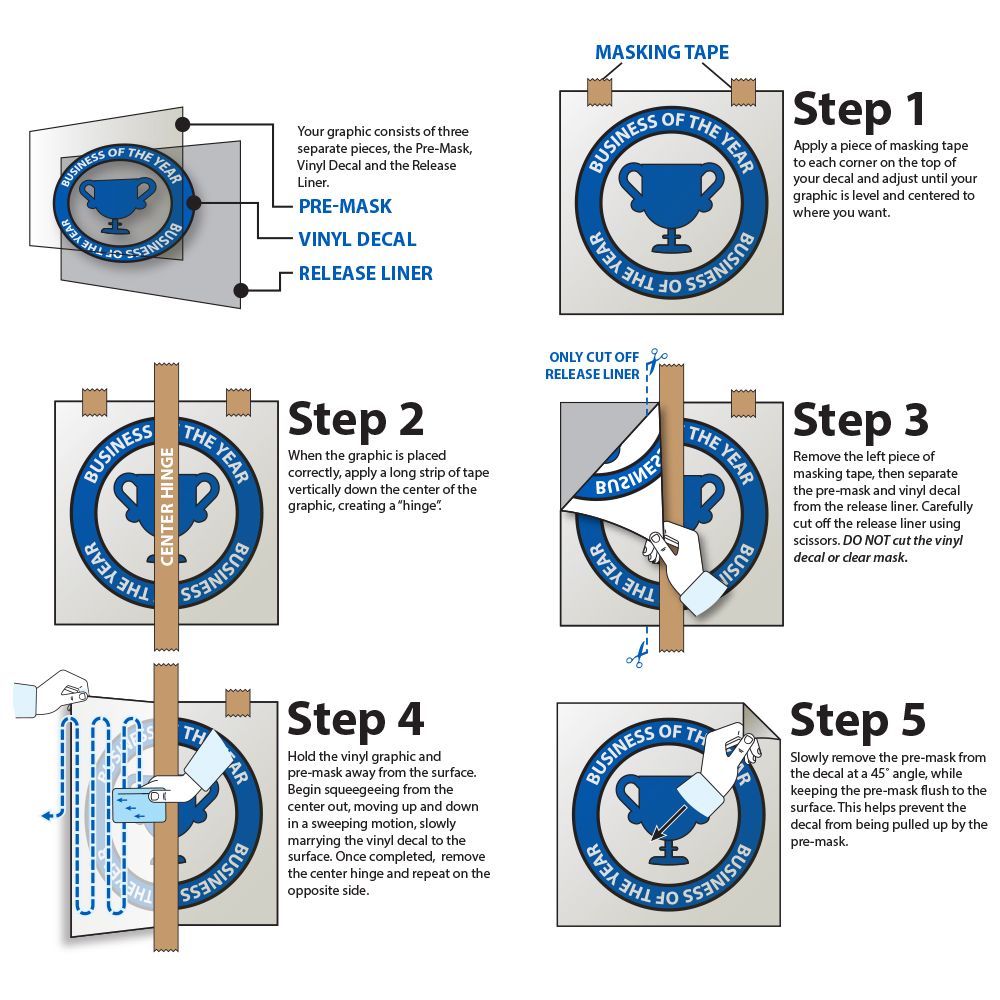
Vinyl Lettering General Installation Instructions
This is a general installation video for vinyl lettering and vinyl decals. Most decals can be installed using this method.
