How To Install Decals On A Car
Applying custom decals on a car is a rewarding way to personalize your ride, and following a careful, step-by-step process ensures a clean, professional finish without damage to the paint.
Preparing the Surface for Decal Installation
Thorough preparation is the foundation of a successful decal application, because dust, grease, or old wax will prevent the adhesive from bonding correctly and lead to premature lifting or bubbling. Begin by washing the area of the car where the decal will go with a gentle automotive soap and a microfiber mitt, then rinse thoroughly and dry with a soft towel to remove any water spots. After the surface is clean and dry, use an isopropyl alcohol solution or a dedicated panel wipe to eliminate residual oils, wax, and contaminants, which helps the decal stick evenly and improves long-term durability.
It is also wise to choose a shaded, cool area to work, since heat can cause the decal material to stretch or react with the adhesive, making precise placement difficult. If the car has any rough patches, stone chips, or peeling clear coat, address those issues first or avoid placing decals directly over them to maintain a smooth surface. Taking the time to clean, dry, and protect the panel pays off with a bubble-free installation and a finish that looks great for years.

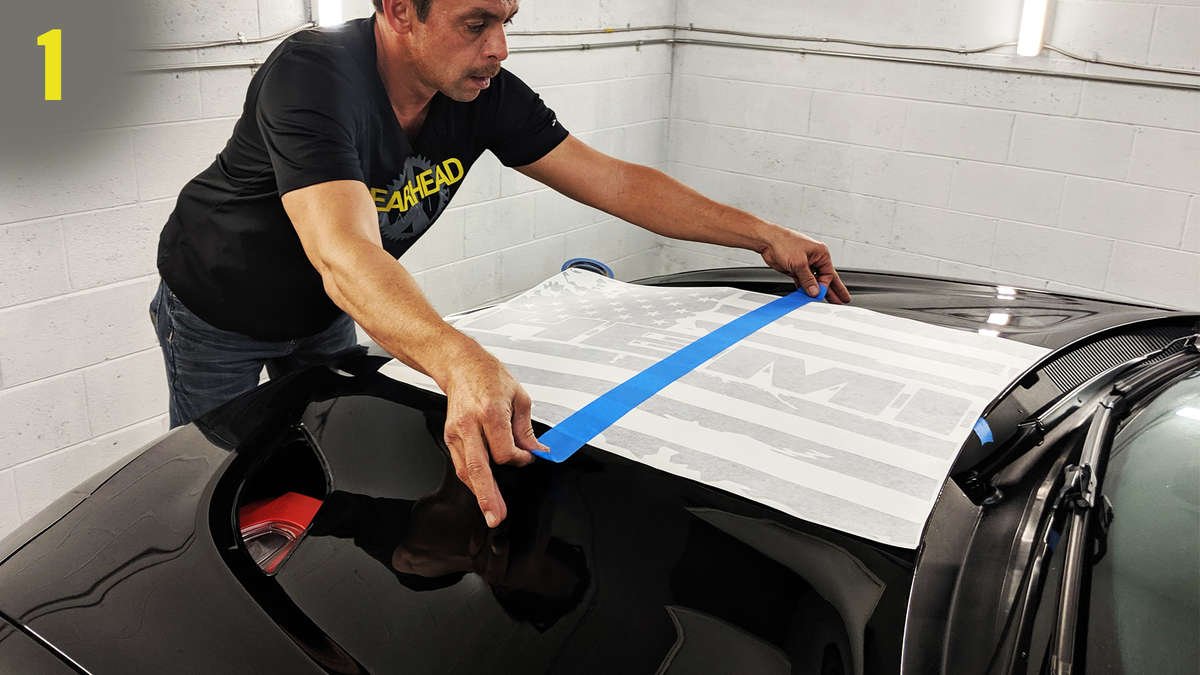
Measuring and Positioning the Decal
Precise measurement and temporary positioning prevent mistakes and allow you to adjust before committing, so use a measuring tape or ruler to find the center point and align the decal exactly where you want it on the panel. You can mark the intended placement lightly with chalk or painter's tape on the car’s body, then hold the decal up to those marks to verify symmetry and height before removing any backing. For decals with multiple pieces, plan the sequence in advance, placing the main element first and using registration marks or overlapping test positions to ensure each component lines up perfectly with the others.
During this stage, consider the direction of curves, creases, or lines on the car’s body, and imagine how the decal will flow over them to avoid awkward twists or folds. If possible, practice the placement on a flat surface or a similar part to build confidence with the material’s behavior. Getting the positioning right at this stage reduces stress later and helps you achieve a clean, intentional look rather than a hurried, uneven application.
Cutting and Handling the Decal
Before applying, carefully cut the decal from its sheet using sharp scissors or a craft knife, leaving a small border around the design to make handling easier while keeping the edges crisp and undamaged. Peel only a small section of the backing at a time, and use a soft microfiber cloth or an application squeegee to smooth the decal as you progress, pushing out air and maintaining control of the piece. If the decal has transfer tape already applied, ensure it sticks completely across the surface before removing the carrier film, because partial adhesion can cause parts to shift or stretch out of alignment.
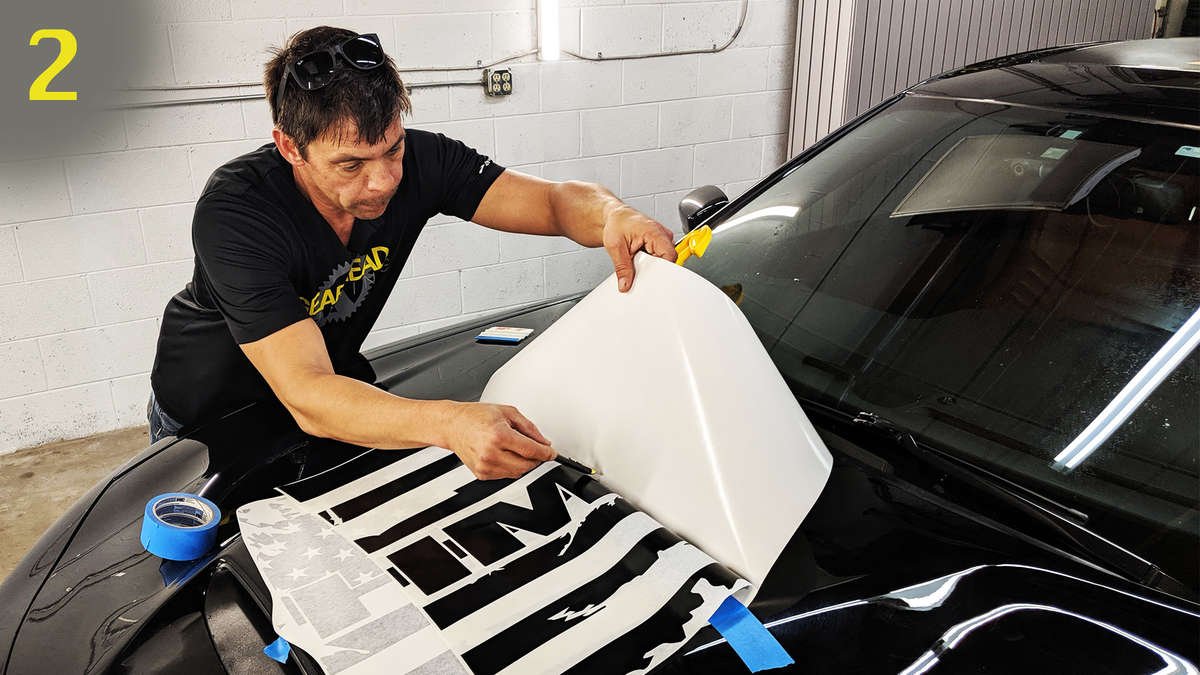
Handle the adhesive side gently, avoiding fingerprints or hard touches that can leave residue or cause premature sticking in unwanted areas. If the decal is large or detailed, consider sectioning the transfer tape strategy, exposing only the portion you are about to apply while keeping the rest protected. Working slowly and deliberately during this phase helps preserve the integrity of the graphics and keeps the material ready for a flawless placement.
Applying the Decal and Removing Bubbles
With the decal positioned correctly, begin the final application by pressing the center first and gradually work outward toward the edges, using a firm but gentle motion to ensure full contact with the painted surface. A soft squeegee or a credit card wrapped in a microfiber cloth is ideal for smoothing the decal and pushing out trapped air, reducing the risk of bubbles forming beneath the adhesive. If a bubble does appear, carefully lift the corresponding area, reapply with light pressure, and glide the squeegee over it again until the surface lies flat and secure.
For detailed sections or complex curves, use the corner of the squeegee to gently massage the decal into place, paying extra attention to corners and edges where lift often starts. Avoid using sharp tools that could scratch the paint, and resist the urge to stretch the material, which can distort the design. Patience during this stage yields a smooth finish with strong adhesion and crisp details that enhance the overall appearance of the vehicle.

Curing and Final Inspection
After the decal is fully applied, allow it to cure for at least twenty four hours before washing the car or subjecting it to heavy rain, because the adhesive needs time to bond securely to the painted surface. During this period, keep the car protected from intense sun and high humidity if possible, since these conditions can interfere with proper setting and long term durability. Once the curing window has passed, inspect the edges, corners, and seams closely, pressing any lifted sections gently back down and cleaning away excess adhesive or residue with a mild cleaner.
A final check under good lighting helps you confirm that the decal is aligned, free of wrinkles, and firmly attached, giving you confidence in the result. If small issues appear later, you can often correct them by lifting a corner, reapplying with the squeegee, and allowing the area to settle again. Proper curing and attentive inspection ensure the decal stays vibrant, securely bonded, and visually appealing for the long term.
Maintenance and Long Term Care
To keep your decals looking sharp, wash the car regularly with pH neutral soap and avoid abrasive sponges or brushes that might catch on the edges and cause peeling. When using a pressure washer, keep the nozzle at a safe distance and use a wide spray pattern so the force does not gradually lift the decal from the surface. Applying a quality wax or sealant around the borders after the cure period can provide extra protection against UV exposure and minor abrasions without interfering with the adhesive.

Over time, check the decals periodically for signs of lifting, especially around corners, and address small issues early to prevent larger problems. With gentle cleaning, mindful washing techniques, and occasional inspections, your decals will remain vibrant and securely attached, showcasing your personal style while preserving the underlying paint in excellent condition.
By following careful preparation, precise positioning, patient application, and consistent maintenance, installing decals on a car becomes a straightforward process that enhances the vehicle’s appearance without compromising its finish.
How to install decals like a PRO!
via YouTube Capture.
