How To Apply Vinyl Stickers

Applying vinyl stickers the right way turns a simple decal into a clean, long-lasting graphic that looks professional on any surface.
Preparing the Surface for Perfect Vinyl Adhesion
The first step in how to apply vinyl stickers is all about the surface. A clean, dry, and smooth area helps the sticker bond evenly and prevents early lifting or bubbling. Before you touch the backing, wipe down the area with a mild cleaner to remove dust, grease, and fingerprints, then dry it completely.
For best results, choose a surface that is flat or only slightly curved. Very rough textures or heavily flaking paint can make it harder for the vinyl to stick consistently. If you are applying the sticker outdoors, avoid windy or dusty conditions, because particles can get trapped under the film and ruin the finish.

Some installers like to use a mild soap solution or application tape during installation, but the golden rule is simple: the cleaner and more stable the surface, the better the vinyl sticker will last. Take your time here, because preparation is what separates a quick peel from a lasting result.
Measuring, Cutting, and Planning the Layout
Good application starts with measurement. Use a measuring tape to note the exact spot where the sticker will sit, and mark a center line or a few light guide dots that you can erase later. This keeps the vinyl sticker straight and aligned from the very first moment.
- Measure both height and width, and compare those numbers to the sticker itself.
- If the design is large, think about dividing it into smaller sections and taping them together before peeling.
- Double-check that the sticker is right side up before you expose the adhesive.
When you are ready, gently cut away any excess material from the edges, but leave a small border if you plan to trim precisely after application. Planning the layout in advance reduces repositioning, which can stretch the vinyl and create wrinkles that are hard to fix later.

Using the Right Tools for a Professional Finish
You do not need a workshop to succeed, but a few simple tools make the difference between a messy job and a crisp install. Most people start with a vinyl sticker, a soft squeegee, a microfiber cloth, and a spray bottle filled with water and a little dish soap.
- Use a credit card or a plastic scraper to push out air pockets without scratching the surface.
- A level or ruler helps when the design is tall or needs to sit perfectly parallel to the ground.
- Masking tape can hold the sticker in place temporarily while you adjust the position.
For detailed work, a hobby knife or craft blade is handy, but keep it sharp and use light pressure to avoid cutting into the surface underneath. The right tools give you control, especially around corners and small details, so you can press the vinyl down evenly and avoid trapped air.
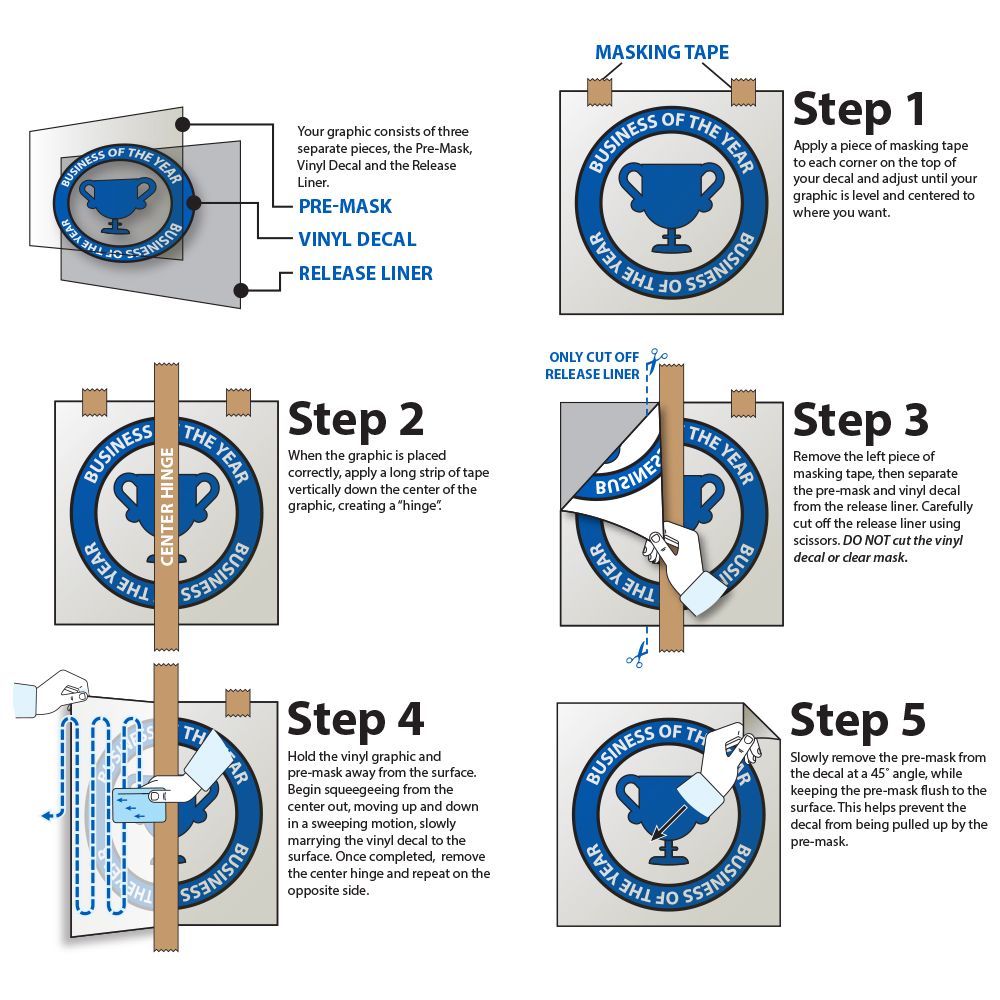
The Step-by-Step Application Process
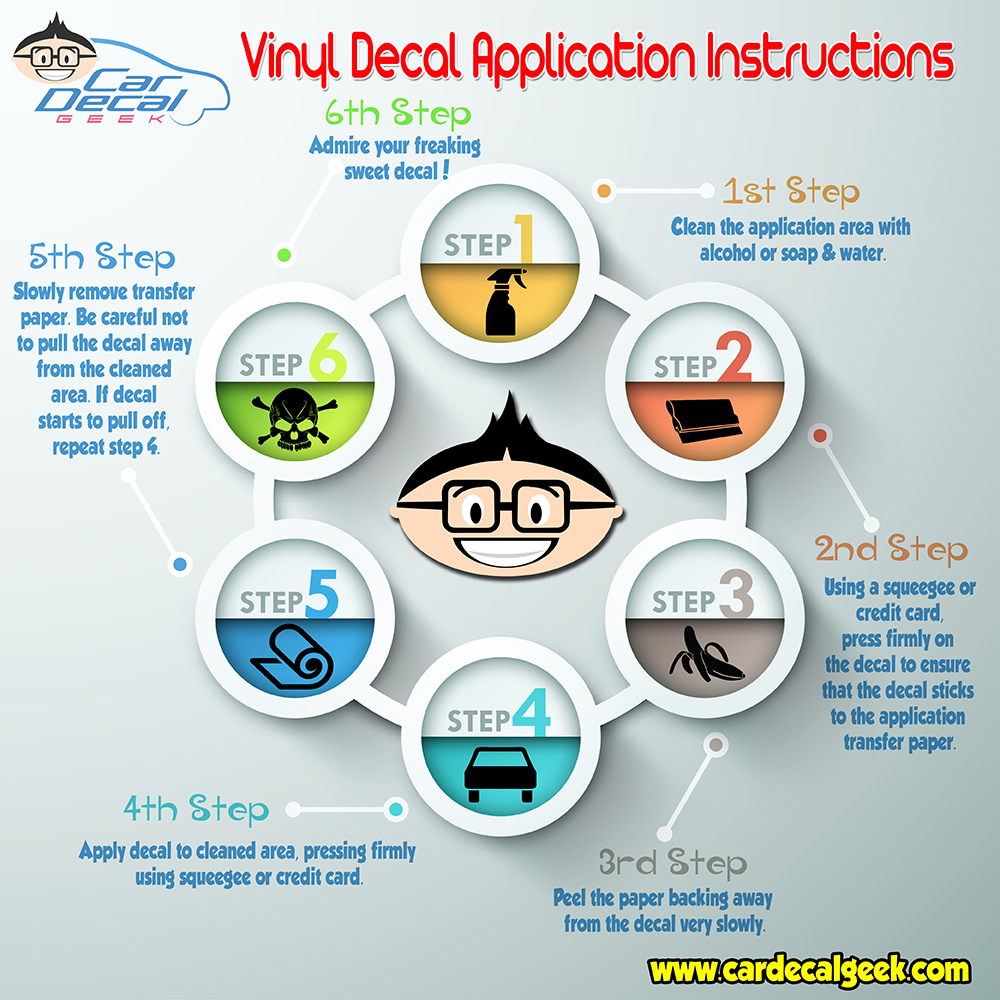
Now it is time to peel and stick, but do it methodically. Start from one corner and slowly lower the vinyl sticker onto the surface, letting the adhesive settle as you go. If the sticker is large, you may find it helpful to apply it in sections rather than all at once.
![Vinyl Decal Application Instructions [Free PDF] - The Momma Llama ...](https://i.pinimg.com/originals/0c/58/c6/0c58c67f2abf2922b6ade18809b7caa6.png)
As the vinyl makes contact, use a squeegee to gently press it down from the center toward the edges. This pushes out excess water and air, giving you a flat, bubble-free finish. If you used the soapy water method, keep the surface wet until you are ready to squeegee, then dry the area thoroughly.
Pay special attention to edges and corners, because they are the first places that lift if they do not bond well. Press firmly, but not so hard that you distort the shape. Work slowly and keep the sticker aligned with your earlier guide marks to maintain a professional look.
Trimming, Smoothing, and Final Inspection
After the sticker is in place, you may need to trim any overhang or correct small misalignments. A sharp utility knife or craft blade, used with a steady hand and light pressure, works well for clean edges. Always cut away from your fingers and use a metal ruler as a guide.
- Run the squeegee again over the entire surface to lock the adhesive into place.
- Check for leftover air bubbles and gently push them out toward an edge.
- Let the sticker cure for a few minutes before touching it heavily.
Inspect the result up close and from a distance. If you spot tiny bubbles, you can usually smooth them with the squeegee. If an edge is not sticking, press it down firmly or, in colder weather, use a hairdryer on a low setting to make the vinyl more flexible for a better bond.
Common Mistakes and How to Avoid Them
Even experienced crafters run into trouble when they rush or skip steps. One common mistake is applying the sticker on a dirty or damp surface, which leads to poor adhesion and early peeling. Another is stretching the vinyl too much while positioning it, which causes distortion and wrinkles that never fully go away.
- Do not peel the backing paper too quickly; work slowly so you can reposition if needed.
- Avoid extreme temperatures, because cold makes vinyl brittle and heat can cause it to stretch.
- Do not press so hard that you scratch the surface or create small ripples around the design.
By learning from these pitfalls, you turn each project into practice for perfectly applied vinyl stickers that look great from day one and stay intact for a long time.
Maintaining Your Vinyl Sticker Over Time
Once the sticker is on and looking flawless, simple habits keep it that way. Clean it gently with mild soap and water, and avoid harsh chemicals or abrasive scrubbing that can lift the edges or fade the colors.
Over time, check the corners and borders, especially in areas that see a lot of movement or weather. If you spot any lifting, press the edge back down firmly or use a small amount of adhesive if the original bond has weakened. With proper care, your vinyl sticker remains vibrant, detailed, and securely attached for months or even years.
Mastering how to apply vinyl stickers means combining careful preparation, the right tools, and a calm, step-by-step approach. When you take the time to measure, clean, and press thoughtfully, even complex designs stay smooth, aligned, and durable. Follow these steps on your next project and enjoy a professional finish that stands out every time.
How to apply large vinyl decals, tutorial
Best vinyl stripe selection and quality: Amazon - https://www.amazon.com/dp/B083F62H71/ref=hnd_dp_smp_text eBay- ...
