How To Apply Vinyl Decals
Applying vinyl decals the right way turns a simple sticker into a clean, long lasting design that looks professional on almost any surface.
Preparing the Surface for a Perfect Vinyl Decal Application
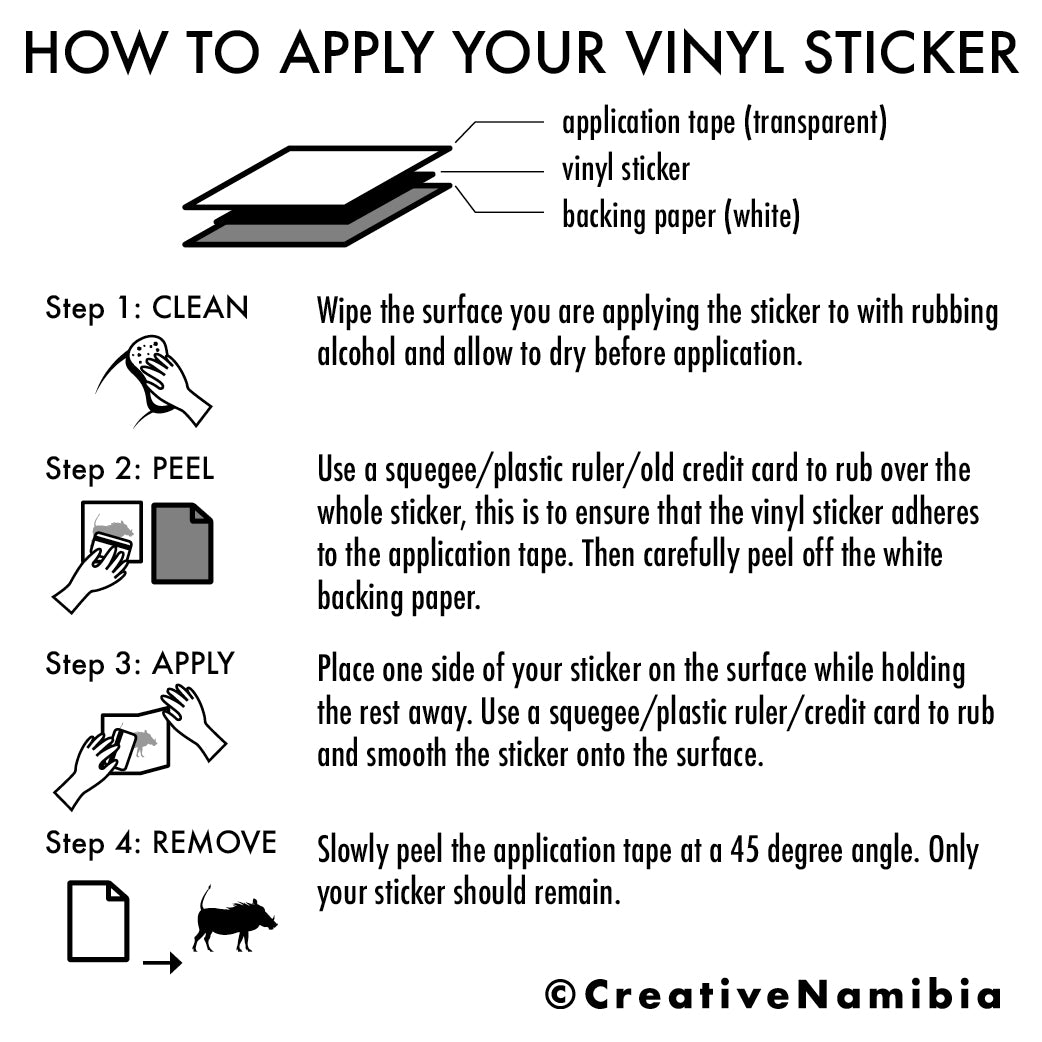
The first step in how to apply vinyl decals is preparing the surface so the adhesive bonds evenly and stays strong over time. You want a smooth, dry, and clean area free from dust, grease, and tiny bumps that can lift edges or create air bubbles. For painted walls, car hoods, or plastic panels, a little isopropyl alcohol works well to remove oils and residue left by fingers or tools.
Temperature also matters because cold surfaces can make the vinyl more rigid and harder to position accurately. If possible, work in a shaded area or indoors where the material is not hot from direct sunlight, since heat can cause the vinyl to stretch and warp during installation. Gather a few simple tools like a soft cloth, mild soap solution, squeegee or credit card, and a razor blade for trimming, so you are ready when it is time to install the decal.

Measuring and Positioning Before You Peel
Before you remove the backing, use masking tape or a removable marker to mark reference lines that help you align the vinyl decal exactly where you want it. Measure from edges, corners, or existing features like door handles and windows to make sure the design is centered or placed at the ideal height for visibility. This planning stage saves you from repeatedly peeling and reapplying, which can strain the adhesive and risk wrinkles.
Some installers lightly mist the surface with a soapy water solution before placing the decal, which gives a temporary slip layer to adjust the position without tearing. Once the decal sits perfectly straight and level, you can gently squeegee out the excess liquid and proceed to the next phase of how to apply vinyl decals with precision.
Peeling and Placing the Vinyl Decal Correctly
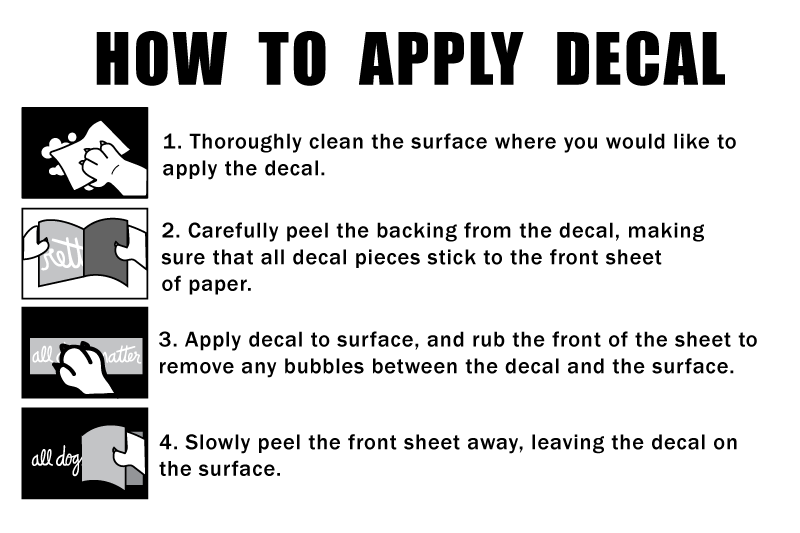
When you are ready to install, start by peeling only a small corner of the backing to expose the adhesive, and keep the rest of the sheet protected from dust and debris. Hold the exposed portion close to the surface and slowly lower it down, using light pressure at first to guide the edges into place without folding or creasing. If you notice any dust or particles trapped under the vinyl, carefully lift the edge and reposition, because trapped debris will show through as bumps once the decal is fully pressed down.

As you continue to peel the backing away, use your free hand to press the vinyl down gently from the center toward the edges, which helps the adhesive make consistent contact with the surface. Avoid pulling the vinyl taut across curves or detailed areas, since overstretching can distort letters, shapes, or intricate cut lines and make the final result look uneven.
Using a Squeegee to Eliminate Bubbles
After the decal is fully on the surface, take a soft squeegee or a plastic card and start from the center, moving outward in smooth strokes to push out trapped air and excess liquid if you used the wet method. Work systematically in sections, overlapping each stroke so you do not miss any areas where tiny bubbles might hide. For stubborn bubbles, lift the edge of the vinyl slightly and re-press from the farthest point of the bubble toward the exit edge, rather than pressing directly on the bubble, which can stretch the material.
Use a microfiber cloth or lint-free towel to buff the surface after squeegeeing, which helps the adhesive seat fully and improves the long term durability of the installation. If you are applying a large vinyl decal on a textured surface, you may need to pause frequently to check for hidden bubbles and smooth them out before they set.

Trimming and Final Touches for a Clean Finish
Once the main design is smooth and bubble free, examine the edges to see if any overhang or excess material needs trimming. A sharp craft knife or razor blade held at a shallow angle works well to slice off extra vinyl cleanly, especially around detailed corners where precision matters. Run the blade along the surface rather than pressing straight down, which reduces the risk of gouging the wall, hood, or panel underneath the decal.
After trimming, run your fingers along the edges to confirm that every part of the vinyl decal is securely bonded, and gently wipe away any remaining soap residue or fingerprints. If you notice small areas that did not stick properly, press them down again with firm, even pressure, and consider using a heat gun on a low setting to soften the vinyl slightly, making it easier to conform to curves or textured surfaces without lifting.
Common Mistakes to Avoid During Installation
One of the most common mistakes when you learn how to apply vinyl decals is rushing the peeling step, which causes the material to twist, crease, or stretch out of shape. Move slowly, keep the vinyl as flat as possible against the surface, and reposition gently if needed instead of forcing it into place. Another mistake is applying the decal in very dusty environments, so even a brief exposure to open windows or fans can introduce particles that compromise the finish.
![Vinyl Decal Application Instructions [Free PDF] - The Momma Llama ...](https://i.pinimg.com/originals/0c/58/c6/0c58c67f2abf2922b6ade18809b7caa6.png)
Using too much pressure with a hard tool can also damage delicate designs, especially those with fine text or thin shapes, so prefer a soft squeegee or cloth wrapped around a card for better control. Avoid extreme temperatures during application, because a hot surface can make the vinyl gummy while a cold surface reduces flexibility, both of which make it harder to achieve a smooth, professional result in your decal projects.
Long Term Care and Maintenance of Vinyl Decals
After you master how to apply vinyl decals, caring for them properly extends their life and keeps colors vibrant against UV exposure and weather. Clean the surface gently with mild soap and water, avoiding harsh solvents or abrasive tools that can scratch the top layer or lift the edges over time. Drying with a soft towel instead of letting the decal air dry helps prevent water spots from forming along the edges.
If you notice edges lifting, a small amount of heat from a hairdryer on a low setting can reactivate the adhesive and press the vinyl back down smoothly. For outdoor applications, occasional inspections allow you to address minor issues before they turn into larger peeling or fading problems, ensuring your design continues to look sharp for months or years.
By following these steps for how to apply vinyl decals, you can achieve clean lines, bubble free surfaces, and professional looking results whether you are customizing a car, decorating a wall, or branding a storefront. With practice, patience, and the right tools, each installation becomes easier and more reliable, giving you confidence to tackle even detailed and large format projects.
Apply Vinyl Decals using the Wet Application Method
How to apply vinyl decals using the Wet Application method. This method of vinyl adhesive application allows you to remove air ...
