How To Apply A Vinyl Decal
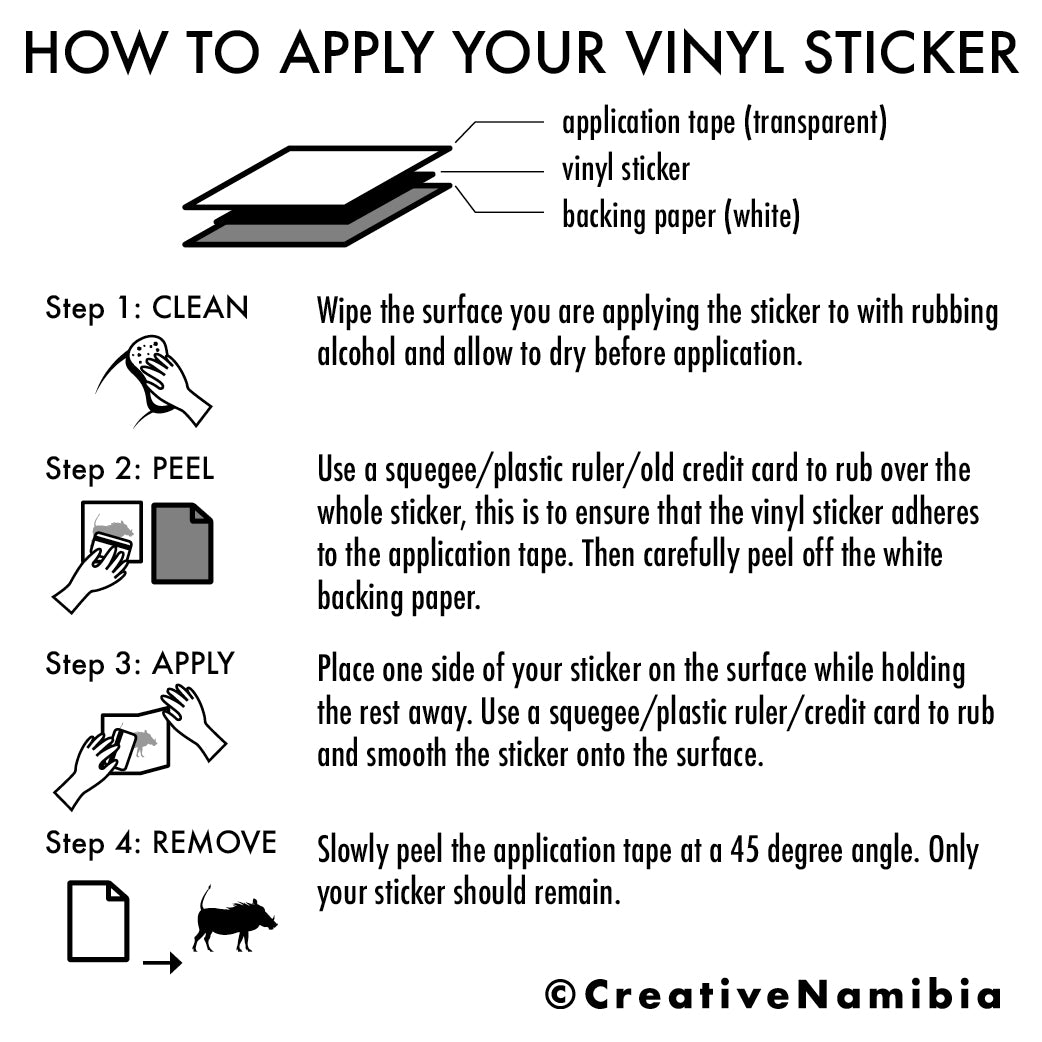
Applying a vinyl decal can transform a plain surface into a bold statement, and with the right steps you can achieve a smooth, bubble-free finish every time.
Preparing the Surface for a Vinyl Decal
The success of any vinyl decal starts long before the sticker touches the surface; thorough preparation is essential for a clean, lasting application. Dust, grease, and surface irregularities are the hidden enemies that cause peeling and bubbling, so you must create a perfectly clean canvas.
Begin by cleaning the area with a mild soap and warm water, then rinse thoroughly and dry completely to remove any oily residues. For an extra level of assurance, use isopropyl alcohol to wipe down the surface, which eliminates fine particles and ensures maximum adhesion from your vinyl decal.

Measuring and Positioning the Decal
Before you remove the backing, precise measurement and positioning will save you from the frustration of rework and wasted vinyl. Use a measuring tape and level to mark the intended area, ensuring that your decal will sit straight and balanced in its final location.
Temporarily place the vinyl decal using a piece of painter’s tape on the top edge, allowing you to step back and evaluate the alignment. This test placement helps you confirm proportions and height, so you can adjust until the design feels perfectly positioned before committing.
Cutting and Trimming the Vinyl Decal
Once you are satisfied with the placement, carefully cut the vinyl decal from its sheet, leaving a small border around the design for easier handling during the transfer process. Sharp scissors or a craft knife will give you clean edges and prevent fraying that could compromise the final look.

Take a moment to inspect the cut edges and smooth any slight imperfections with your fingers, ensuring that the vinyl follows the intended contours of your design. A well-trimmed decal not only looks professional but also adheres more evenly to the surface during application.
Using Transfer Tape for a Smooth Application
Transfer tape is a crucial tool that holds the individual elements of your vinyl decal together and allows for a controlled, air bubble-free application. Carefully apply the tape over the entire design, pressing firmly from the center outward to eliminate any trapped air.
Peel away the backing paper slowly, making sure the vinyl decal stays firmly attached to the transfer tape. If any part of the design resists, gently press the transfer tape over that area again to ensure complete adhesion before moving on to the next step.
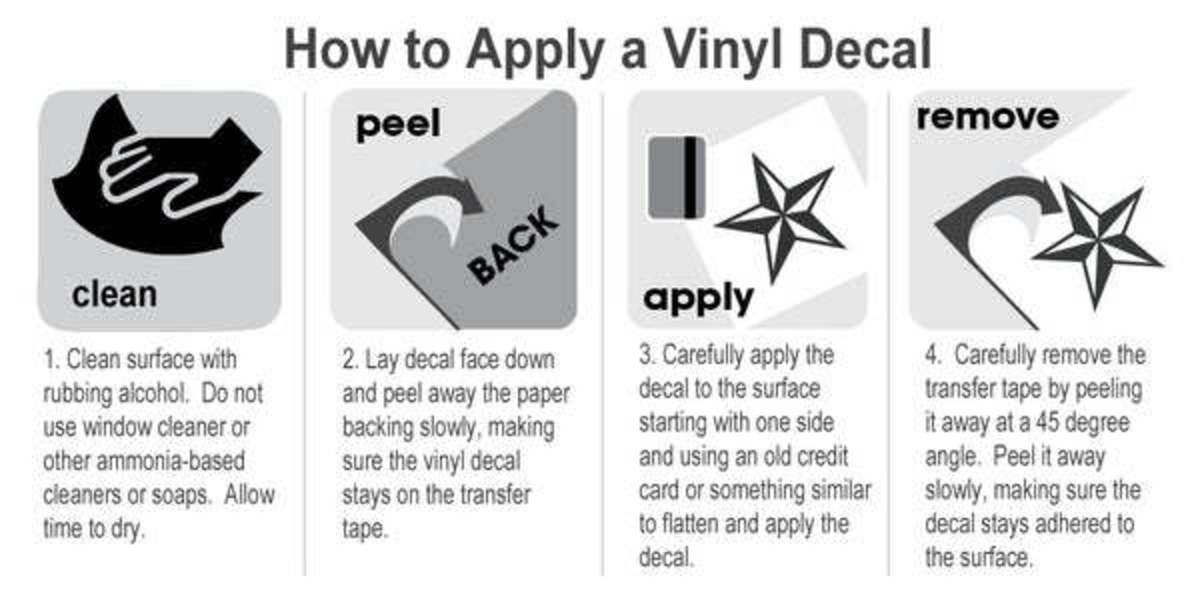
Applying the Decal to the Surface
With the decal prepared on transfer tape, align it carefully over your chosen surface, making final adjustments before any adhesive touches the material. Slowly lower the design into place, using a squeegee or credit card to press the vinyl down smoothly as you go.
Work from the center toward the edges, pushing out air pockets and ensuring firm contact between the vinyl and the surface. This methodical approach reduces the risk of wrinkles and gives your decal a professional finish that lasts.
Removing the Transfer Tape and Final Touches
After the vinyl decal is fully pressed onto the surface, it is time to remove the transfer tape without disturbing the delicate adhesive bond. Peel the tape back at a sharp angle and at a moderate speed, stopping immediately if you notice any parts lifting.

If small sections do start to lift, gently press them back down with your squeegee and continue peeling more slowly. Once the transfer tape is completely removed, inspect the edges and use a soft cloth to smooth the entire decal, ensuring it is securely in place and ready to brighten your space.
By following these detailed steps, you can confidently apply a vinyl decal on almost any surface, enjoying vibrant graphics and long-lasting results that reflect your personal style.
Como aplicar um decalque de carro - Etapas detalhadas - Método seco - Aplicação até a remoção
Este é um vídeo instrucional sobre como aplicar um decalque em qualquer superfície lisa usando o método seco. As superfícies ...
