Dots Per Inch

Understanding dots per inch helps you make smarter choices when printing photos, documents, or digital designs, because this tiny measurement quietly shapes how crisp and detailed your output looks.
What dots per inch means and why it matters
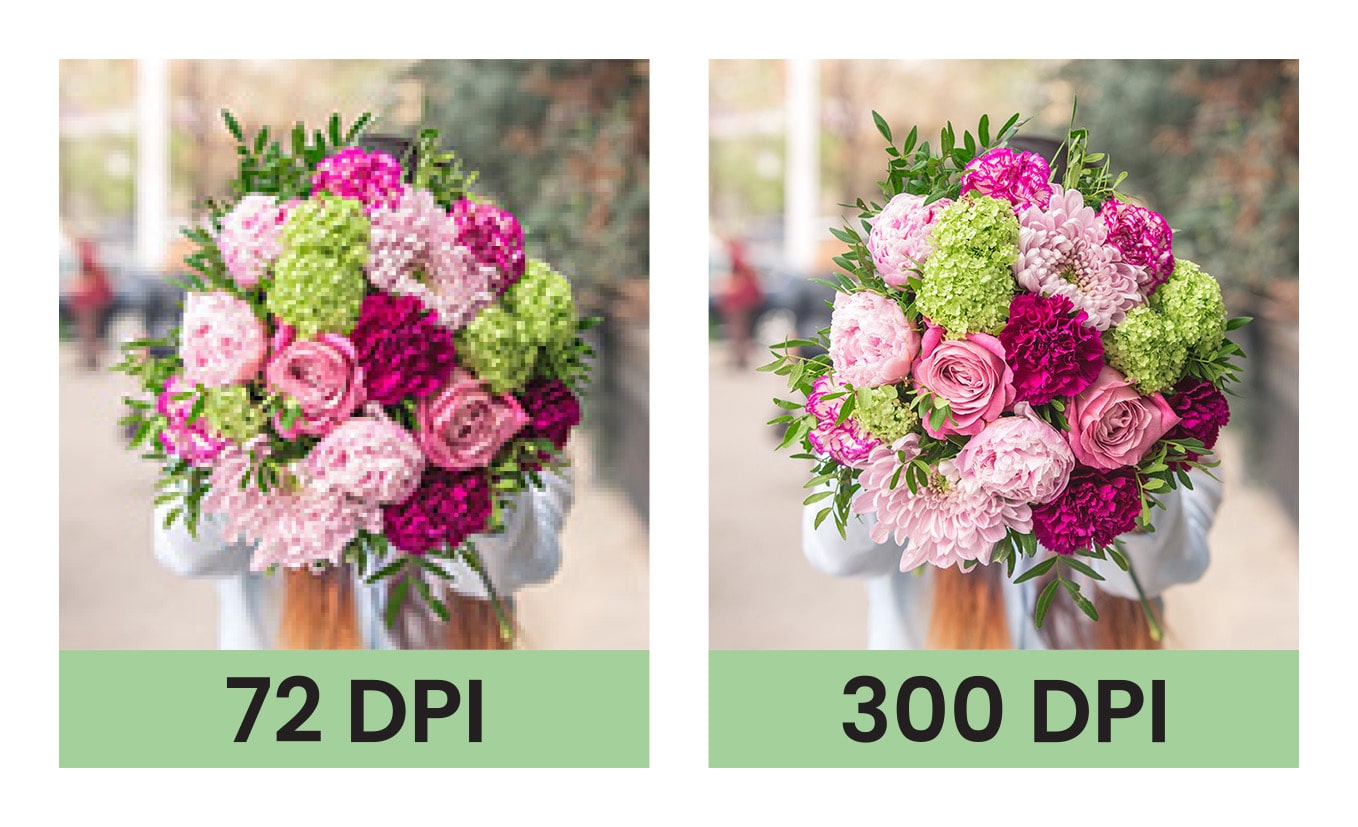
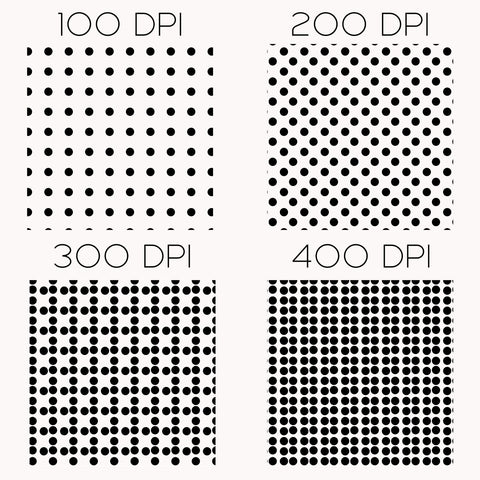
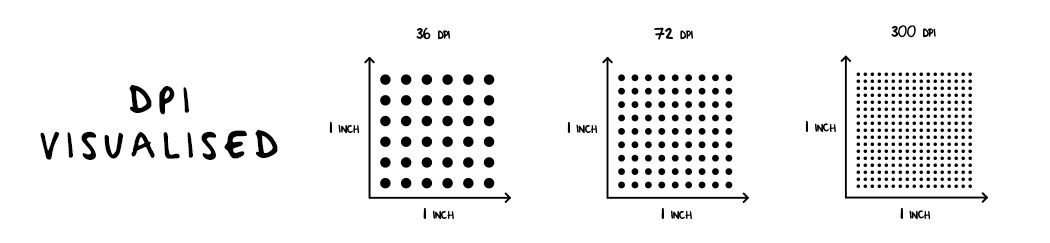
At its core, dots per inch, often written as DPI, counts how many individual ink dots a printer can place within a linear inch of paper or screen space. The higher the number, the more dots fit into that inch, and the more opportunities the device has to render subtle gradients, fine textures, and razor-sharp edges. In everyday practice, professionals talk about image resolution in terms of dots per inch when they prepare files for print, because the setting directly influences perceived sharpness and detail.
On screen, the same idea appears in pixel density, where a higher concentration of pixels in a given physical area creates a crisper display, but the term DPI is still useful when discussing output devices like inkjet printers, laser printers, and even some high-resolution monitors. Thinking of dots per inch as a bridge between digital design and physical print helps you avoid surprises, such as images that look great on screen but turn out pixelated on paper.

DPI in printing: how it affects quality
When you send a file to a printer, the driver and the printer firmware translate the digital image into a pattern of microscopic dots of ink, and the chosen dots per inch setting determines how densely those droplets are laid down. For high-quality photographic prints, many experts recommend aiming for at least 300 dots per inch at the final output size, because this density usually hides the individual ink droplets from normal viewing distance. In commercial printing, such as magazines or brochures, you might encounter requirements for 600 or even 1200 dots per inch, especially for fine line art, text, or detailed illustrations where edge smoothness is critical.
It is important to distinguish between native printer resolution and the effective resolution of your source file. A printer may be capable of 4800 dots per inch in one direction, but if the image only contains 150 pixels per inch, upscaling cannot create real detail, and you may see softness or interpolation artifacts. To get the best results, match your artwork’s resolution to the intended print size and the printer’s recommended DPI range, and always check the printer’s documentation for optimal settings on different paper types.
Screen display and the role of pixel density
On monitors, smartphones, and tablets, the familiar cousin of dots per inch is pixels per inch, or PPI, which measures how many physical pixels are packed into each inch of the display. Devices with high pixel density, such as modern Retina and OLED screens, can show text and images with noticeably smoother edges and finer detail, even if the DPI setting in the operating system is not dramatically increased.
While a typical LCD monitor might advertise a pixel density around 100 pixels per inch, high-end design displays and laptops aimed at creative work often exceed 200 pixels per inch, bringing them closer to the visual sharpness of printed materials viewed at arm’s length. Understanding the relationship between DPI, PPI, and viewing distance helps you choose the right screen for tasks like photo editing, CAD work, or reading, without overspending on resolution you cannot fully appreciate.
Choosing the right DPI for different projects
Not every project demands the same dots per inch, and using a one-size-fits-all approach can waste storage space, printing costs, and processing power. Below are common scenarios and practical guidelines to keep in your back pocket.
- Photographic prints for home or gallery: aim for 300 dots per inch at the final print size, and start with a camera or scan resolution that supports this target.
- Large-format posters viewed from afar: you can often get away with 100 to 150 dots per inch, because viewers typically stand back and do not inspect fine detail up close.
- Web graphics and digital mockups: focus on pixel dimensions and on-screen clarity rather than DPI, but export at a resolution that balances file size with visual fidelity.
- Text and line art for professional printing: consider higher dots per inch settings, such as 600 or more, to keep edges crisp and avoid jaggedness on fonts and diagrams.
When in doubt, consult the specifications of your printer, the requirements of your client or platform, and always do a small test print to verify that text, gradients, and fine patterns look exactly as you expect before committing to a full run.
Common misconceptions and troubleshooting
One frequent myth is that simply raising the DPI setting in an image editor will magically improve quality, but in reality, upscaling a low-resolution file usually results in blurry edges and artificial details rather than true sharpness. Another misconception is that dots per inch alone determines final print quality; factors like ink type, paper texture, color calibration, and printer maintenance play equally important roles.
If your prints look softer than expected, start by checking the effective resolution of the original file, ensuring it matches or exceeds the target DPI at the intended output size. Verify that your printer drivers are set to the correct quality mode, try different paper trays for the appropriate DPI range, and run alignment or head-cleaning cycles if you notice banding or missing dots. For critical work, consult the printer’s manual or support resources to find the sweet spot between speed, ink usage, and detail.
DPI in professional workflows and file preparation
Designers, photographers, and printers often coordinate using clear standards for dots per inch to avoid rework and ensure consistent results across different devices. When you prepare a file for print, embed the intended DPI metadata, use color profiles that match the output medium, and double-check the physical dimensions so the software does not silently resample the image.
Collaborating with your printer or lab about their preferred settings can save time and money, especially for complex projects like catalogs, packaging, or fine-art reproductions. By combining a solid understanding of dots per inch with good file preparation habits, you can enjoy sharper prints, more predictable screen-to-paper matches, and fewer last-minute surprises when your work finally reaches the final output stage.
Conclusion
Whether you are printing a cherished family photo, preparing marketing materials, or fine-tuning a digital illustration, dots per inch quietly shapes the clarity, detail, and overall professionalism of your results.
Dots Per Inch feat. Effie - Emotion
Stream more Armada Music hits here: https://WeArmada.lnk.to/PLYA Listen or download: https://ARDP415.lnk.to/EmotionYA ...
