Decal Installation
Professional decal installation turns a simple sticker into a polished, long lasting graphic that can transform a vehicle, sign, or piece of equipment.
Understanding Decals and Why Surface Prep Matters
A decal is more than just a sticker; it is a printed design laminated with adhesive and often a clear top layer for protection. The success of any decal installation depends almost entirely on meticulous surface preparation rather than the complexity of the material itself. Before applying, you must ensure the surface is completely clean, dry, and free of dust, oils, and residues that can compromise adhesion. Even the best vinyl will lift or bubble if dust or silicone is present under the film, so a thorough wash and a final wipe down with a proper panel wipe or isopropyl alcohol solution is essential.
Different substrates require different approaches to decal installation, and recognizing the material is the first step toward a flawless result. Soft plastics, textured walls, curved panels, and bare metal each present unique challenges that influence the tools and techniques you will use. For porous surfaces or items that will endure harsh weather, you may need a more aggressive adhesive or additional sealing steps to ensure the decal survives temperature swings and UV exposure. Understanding these variables before you begin allows you to select the right tools, adhesives, and installation methods for a durable finish.
Gathering the Right Tools for a Professional Finish
Having the correct tools on hand streamlines the process and reduces the risk of errors during decal installation. At a minimum, you should prepare a soft squeegee, a spray bottle with a mix of water and a few drops of dish soap, a razor blade or utility knife, measuring tape, and lint free towels for drying. For larger or precision work, a heat gun or low temperature torch can help soften edges and eliminate wrinkles without damaging the material, while application tape or transfer film protects the surface during placement.
- Soft edge squeegee for even pressure and to avoid scratching.
- Spray bottle with water and mild soap for slip solution during positioning.
- Sharp utility knife or razor for precise trimming of excess material.
- Lint free towels or microfiber cloths for drying and cleaning.
- Heat gun or torch (on low) for conforming to curves and releasing air.
- Application tape or low tack tape to secure the decal temporarily.
Preparing these items in advance means you will not have to pause mid installation, which can lead to semi permanent air bubbles or misaligned edges. Organizing your workspace also protects the decal from accidental scratches or contamination before it is fully applied. A clean, well lit area with a stable surface gives you the control needed to position the graphic accurately and avoid costly rework.
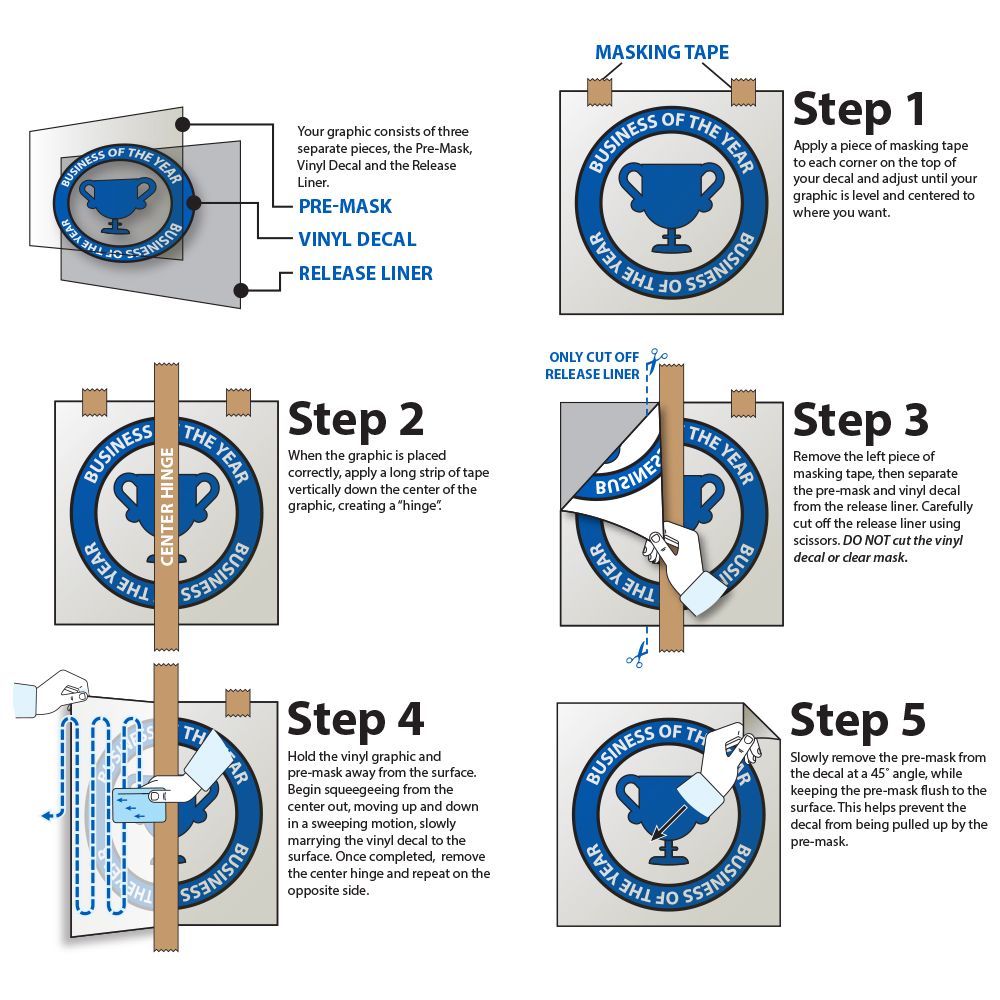
Step by Step Application Process for Flawless Results
The actual decal installation process should follow a logical sequence to ensure the graphic lies flat and adheres evenly across the entire surface. Begin by masking the area with tape if necessary, then clean the surface once more right before application to remove any new dust. Position the decal carefully, align key reference points first, and then lower it onto the surface from one side to avoid trapping large pockets of air underneath. Using a soft squeegee, work from the center outward, pushing water and soap toward the edges while slowly pressing the adhesive down firmly.

As you progress, you may need to lift a corner gently to release more water or to make small adjustments, which is why the slip solution is so valuable during installation. Once the decal is mostly flat, use firm, even pressure with the squeegee to ensure the adhesive bonds to the surface, paying special attention to edges and corners where lift often begins. For detailed sections or textured surfaces, you may burnish carefully with a soft tool to press the material into grooves without stretching or distorting the graphic.
Trimming and Final Inspection for Long Lasting Appeal
After the bulk of the water is removed, carefully trim the excess material using a sharp blade held at a shallow angle to avoid cutting into the edges of the decal. Run the blade along the surface with light, controlled strokes, letting the sharp edge of the decal guide the cut for a clean line. Inspect the finished installation under good lighting to spot any remaining bubbles, wrinkles, or lifted corners, and address them before the adhesive fully cures.
- Use a pin or needle to pierce tiny bubbles, then smooth them out with the squeegee.
- Avoid aggressive solvents on the surface for at least 24 hours to allow the adhesive to bond.
- Check the edges periodically, especially in windy or dusty environments, to ensure they remain sealed.
Patience during this stage of decal installation pays off, as rushing the process can lead to rework or premature failure. A final wipe down with a gentle cleaner and a soft cloth will remove any remaining residue and reveal the full clarity and vibrancy of the graphic. When done well, the installation should be nearly invisible, with the decal appearing as a natural part of the surface.

Common Mistakes to Avoid During Installation
Even experienced installers can encounter issues during decal installation if they overlook subtle but critical details. One of the most frequent errors is applying the decal in cold or damp conditions, which prevents the adhesive from flowing and bonding correctly. Rushing the alignment and trying to slide the decal into place after it has touched the surface often results in wrinkles or a permanent crease that cannot be removed.
Over stretching the material to fit edges or corners is another pitfall that causes stress points, leading to cracking or peeling over time. Using dirty or oily cloths to press the decal down can trap contaminants that weaken adhesion, while metal tools used aggressively can easily scratch softer surfaces. Avoid these issues by planning your workflow, working in a controlled environment when possible, and handling the decal gently with clean hands or soft gloves.
Maintenance and Long Term Performance Tips
After a successful decal installation, proper maintenance will preserve the appearance and extend the life of the graphic significantly. Regular washing with mild soap and soft cloths or sponges keeps dirt from grinding into the surface and prevents premature wear along the edges. When rinsing, direct water streams along the edge of the decal to gradually push dirt away instead of forcing it underneath the film.

For outdoor applications, occasional checks for edge lifting and early signs of UV fading allow you to intervene before small issues become major repairs. If you notice persistent bubbles or lifting corners, carefully press them down with a soft cloth after lifting the edge slightly, and consider using a compatible seam sealer for long term protection. With consistent, gentle care, a professionally installed decal can remain vibrant and intact for many years, showcasing your brand or design exactly as intended.
Apply Vinyl Decals using the Wet Application Method
How to apply vinyl decals using the Wet Application method. This method of vinyl adhesive application allows you to remove air ...
