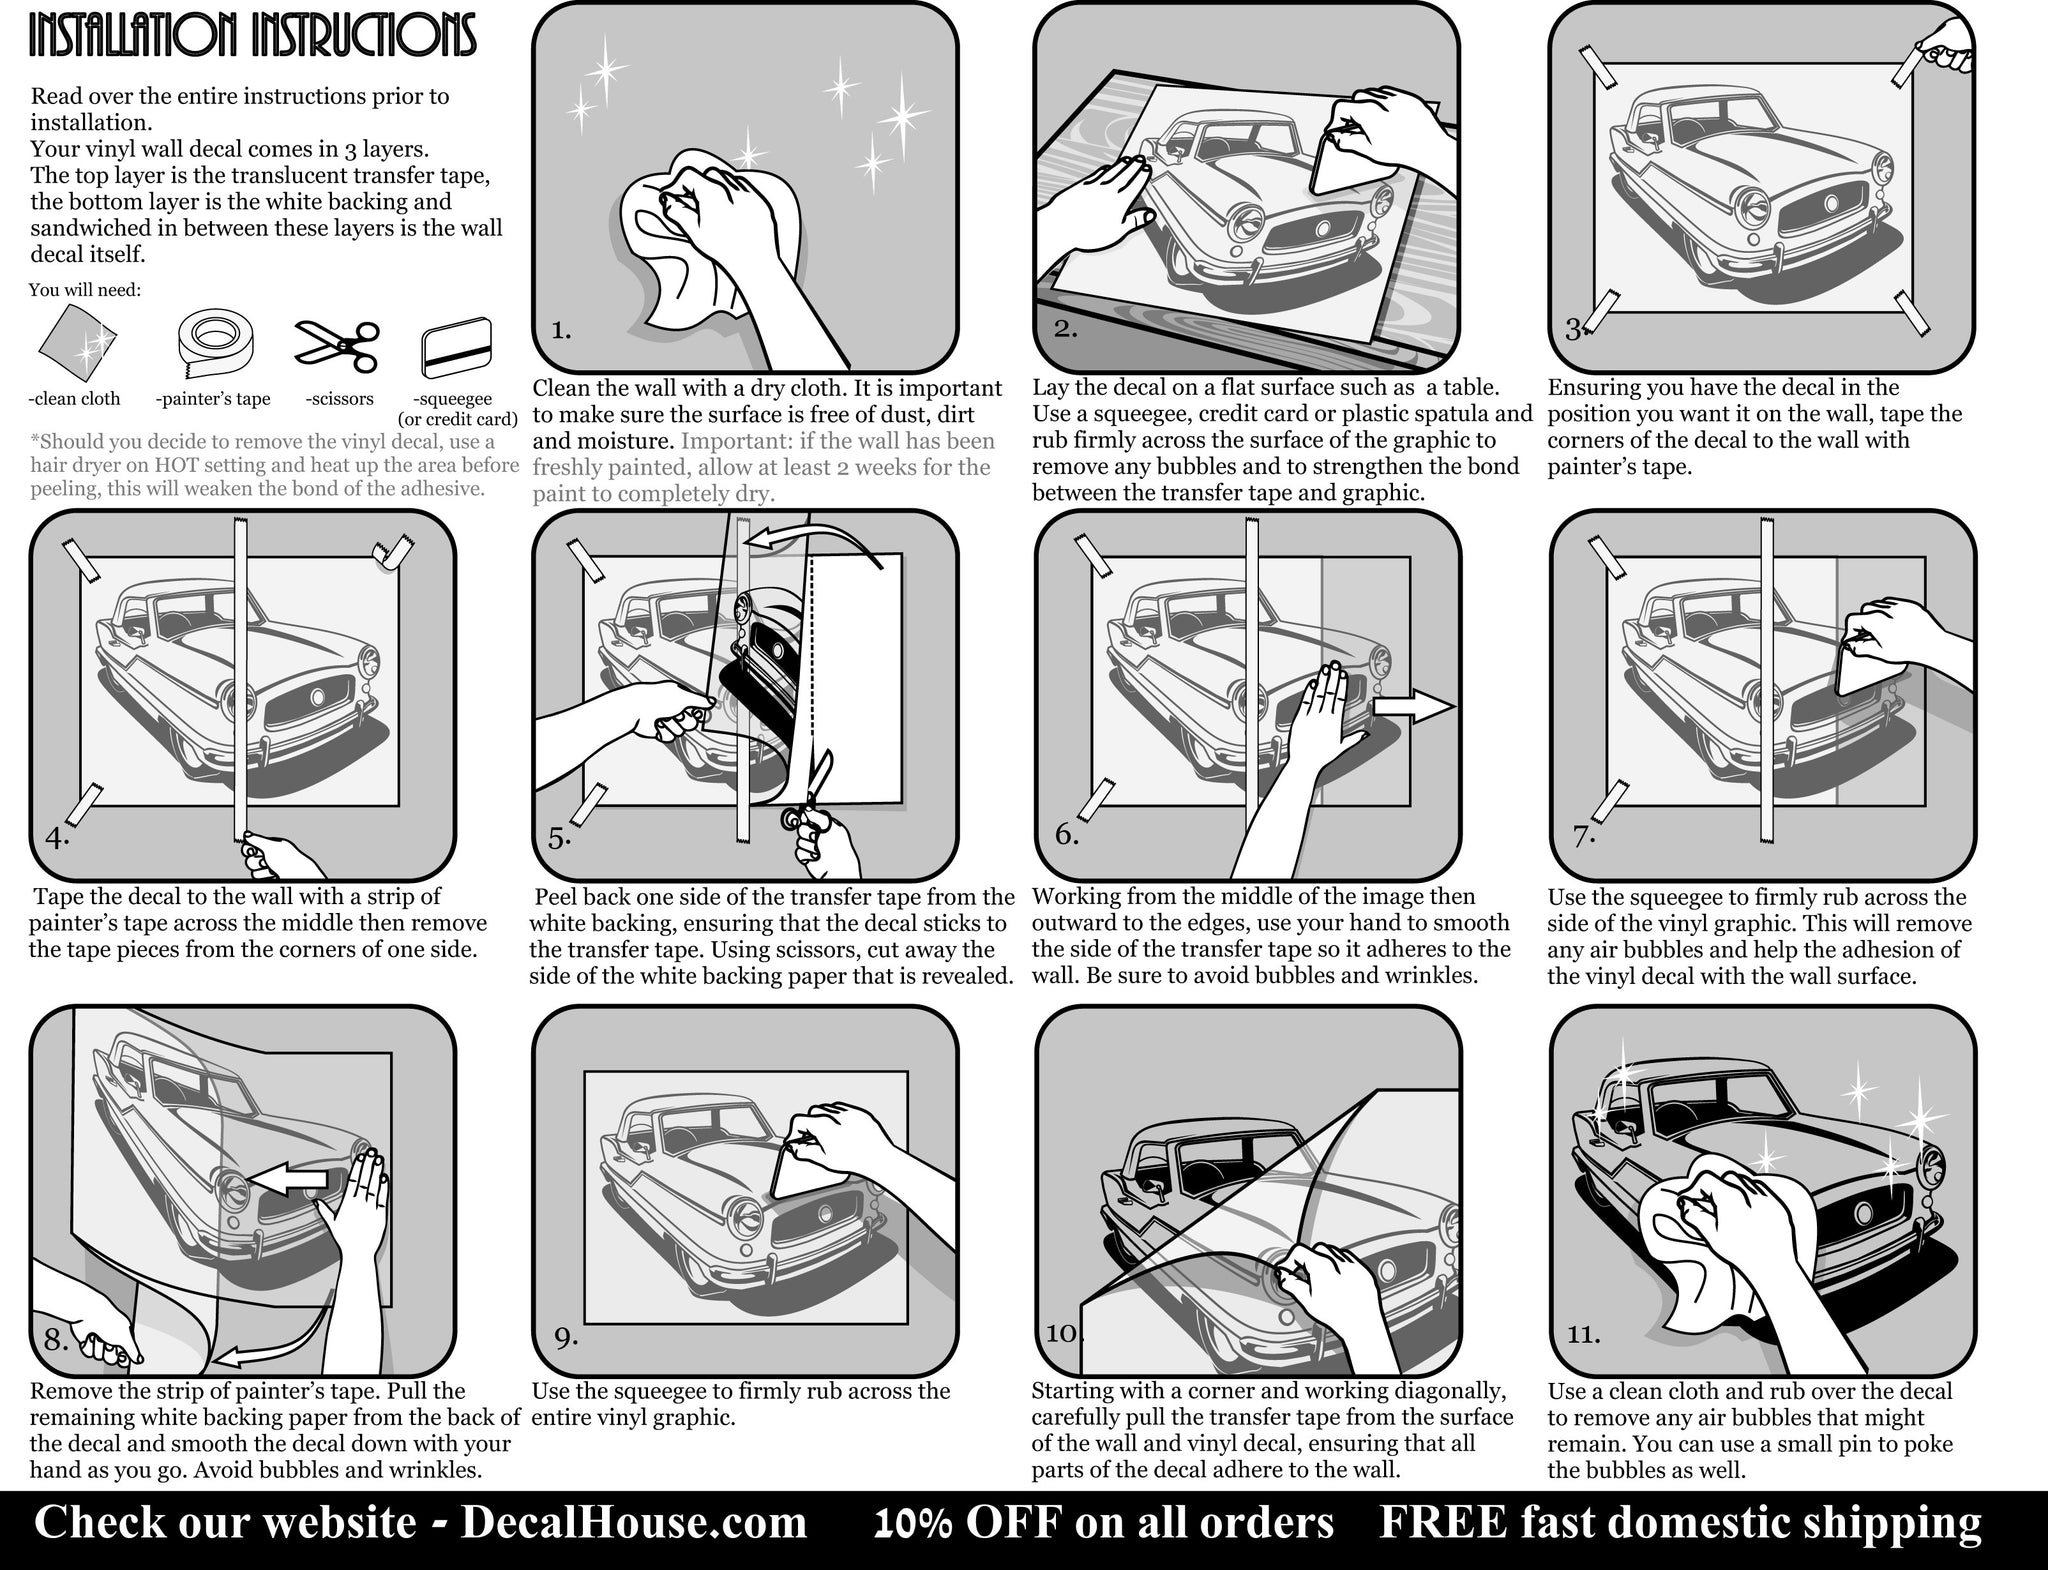
Decal Application

Mastering decal application transforms ordinary surfaces into personalized statements, whether you are customizing a vehicle, personalizing electronics, or branding a storefront window.
Understanding Decals and Their Versatility
At its core, a decal is a design printed on special paper or film with a removable adhesive layer that allows it to be transferred from its release sheet to a target surface. Unlike paint or permanent stickers, quality decals offer vibrant graphics, weather resistance, and the flexibility to reposition during application when done correctly. This versatility makes them popular for vehicle wraps, model building, signage, hobby projects, and promotional giveaways, because they deliver professional looks without the cost of custom manufacturing.
Decals come in several formats, including waterslide decals for intricate shapes, dry decals for smooth surfaces, and vinyl cut decals for bold, long lasting statements. Each type interacts differently with the surface and environment, so understanding the material helps you choose the right adhesive strength and protective finish. Whether you are applying a small logo inside a cabinet or a full vehicle graphic outdoors, matching the decal type to the substrate and exposure conditions is essential for durability and appearance.

Preparing the Surface for Flawless Adhesion
Surface preparation is the single most important factor in successful decal application, because dust, oils, or residue create weak spots that lead to lifting, bubbles, or early failure. Begin by cleaning with a mild detergent and water, then rinse thoroughly and dry completely before moving to the next step. For glossy or low energy surfaces like plastic bumpers or painted panels, a light wipe with isopropyl alcohol can remove any remaining contaminants and slightly etch the surface to improve grip.
Beyond cleanliness, consider temperature and texture, because extreme heat, cold, or very porous materials can compromise adhesion. If the surface is curved, test the decal on a flat area first to gauge how the film conforms. For best results, ensure the surface is smooth, dry, and at a moderate temperature, which allows the adhesive to bond evenly and reduces the risk of wrinkles or incomplete contact.
Positioning and Aligning Decals with Precision
Proper alignment turns a simple decal into a polished result, especially for multi piece designs or brand logos where even a few millimeters matter. Start by dry positioning the decal without removing the backing fully, using masking tape to hold edges lightly. Step back to verify symmetry, level lines, and spacing, adjusting until the composition feels balanced relative to the object’s shape and key reference points.

Use a measuring tape or soft ruler to mark center lines or key registration points on the surface before peeling the release sheet. For complex layouts, take a photo of the dry positioned decal so you can reference placement once the adhesive is exposed. When working with large or detailed transfers, consider sectioning the decal into manageable segments, which makes handling and bubble removal easier while maintaining precise registration across the entire design.
Applying Water and Squeegee Techniques for Smooth Results
For waterslide and similar wet application decals, the water dip method softens the carrier film and allows the graphic to slide into place with minimal stress. Submerge the decal and backing paper in clean water for the recommended time, usually thirty to sixty seconds, until the printed image begins to separate from the clear carrier. Carefully slide the decal off the backing onto the prepared surface, starting from one edge and guiding it into position without stretching.
Once the decal is in place, use a firm, smooth squeegee or a soft sponge to press from the center outward, pushing excess water and air bubbles toward the edges. Multiple light passes are better than aggressive single strokes, which can distort fine details or trap new bubbles. After the surface feels dry to the touch, inspect the decal under different lighting angles to catch any remaining bubbles or lifted corners for targeted re application of pressure.
Removing Bubbles and Correcting Common Issues
Even experienced installers encounter bubbles, wrinkles, or misalignment, but these issues are often fixable if addressed promptly. To lift a small bubble, gently lift the edge of the decal, reapply pressure with the squeegee, and work the air out toward a trimmed edge or seam. Avoid sharp tools that can pierce the film; instead, use the corner of a credit card or a soft felt squeegee to smooth the surface without scratching.
For edges that begin to lift, a targeted application of a few drops of diluted adhesive or a reinstallation of the protective topcoat can restore bond strength. If the decal shows slight wrinkles after drying, carefully re wet the area with a fine mist, reposition, and squeegee again, accepting that some materials have limited flexibility. Patience and gentle handling during troubleshooting prevent more serious damage and help maintain crisp graphics.
Protecting and Maintaining Long Lasting Decals
A protective layer is crucial for outdoor decals and high touch surfaces, because it shields the ink and adhesive from abrasion, UV light, and chemical exposure. Choose a compatible clear topcoat, such as a polyurethane or specialized decal overlaminate, applied in thin, even coats to avoid yellowing or cloudiness. For vehicle wraps and exterior signage, select products rated for weather resistance and follow the manufacturer’s recoating intervals for optimal longevity.

Regular maintenance extends the life of any decal, with gentle washing, soft cloths, and nonabrasive cleaners preventing premature wear. Avoid harsh scraping or pressure washing at close range, which can lift edges and erode details over time. By combining careful application with thoughtful protection and maintenance, decal projects remain vibrant, intact, and visually striking for years.
Conclusion
Successful decal application blends careful preparation, precise positioning, and controlled technique, resulting in graphics that look professional and last through daily use.
Scale Model Basics: How to apply decals the right way to a scale model
Welcome to FineScale Modeler magazine's Scale Model Basics: How to apply decals the right wasy to a scale model. Do you ...
