Applying Vinyl Stickers
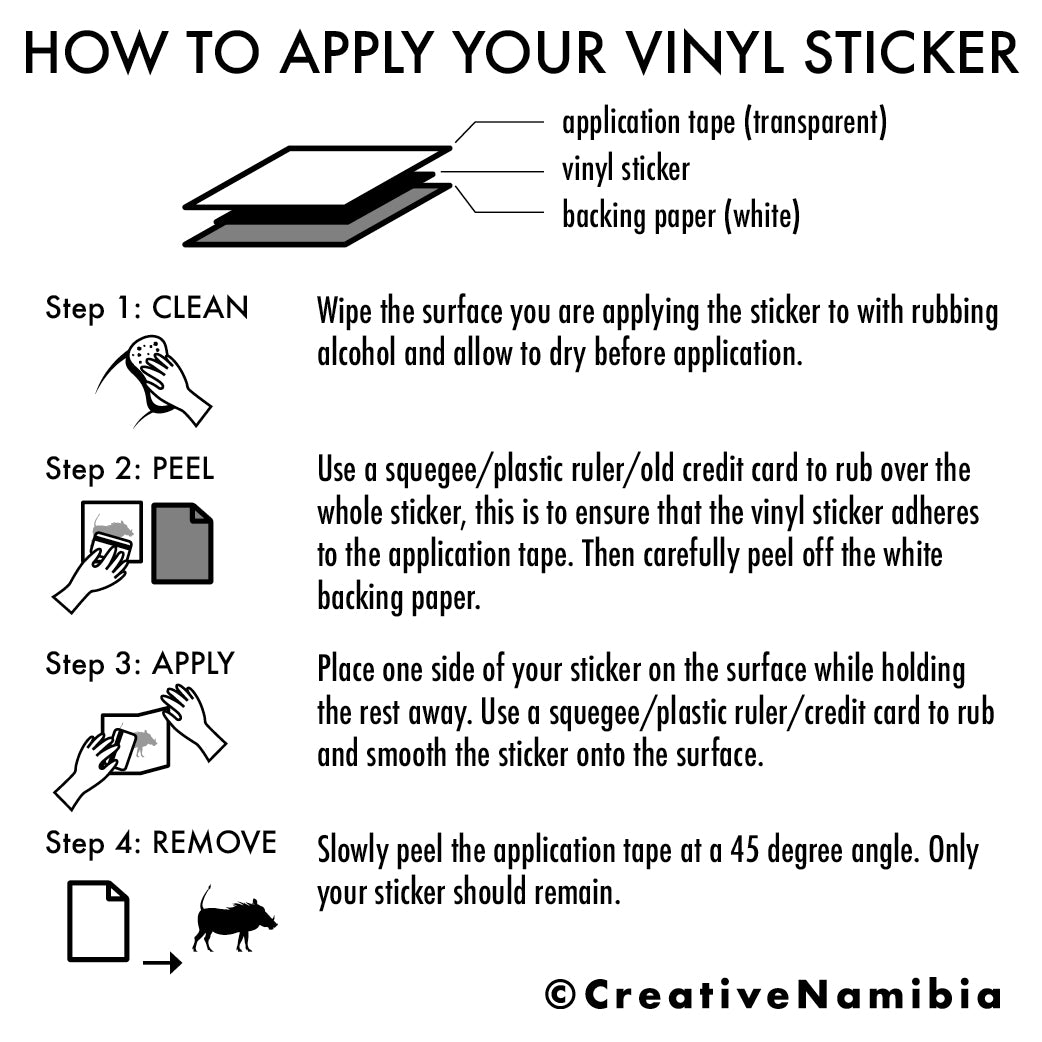
Applying vinyl stickers the right way makes a huge difference in how long they last and how cleanly they look on any surface.
Preparing the Surface for Vinyl Stickers
Before you even touch the sticker, the surface must be ready, because dust, oil, or residue will quickly ruin the bond.
Start by cleaning with a mild soap and warm water, then wipe the area with isopropyl alcohol to remove any remaining grease or silicone.
Make sure the surface is completely dry, at room temperature, and out of direct sunlight so the adhesive stays flexible and easy to position.

Measuring and Positioning the Vinyl Decal
Measure carefully and use a light pencil line or tape cross to mark the center, because precise alignment is one of the keys to a professional finish.
Peel only a small section of the backing and align the sticker against your marks, letting the vinyl cling lightly without bending sharply.
If the sticker has a clear application tape, keep it on for now, since it protects the vinyl and makes sliding into place much easier on large designs.
Removing Bubbles and Smoothing the Vinyl
Once the vinyl is on the surface, work from the center outward with a soft squeegee or a credit card to push air out and avoid trapped bubbles.

Use slow, firm strokes at a low angle so the vinyl conforms to curves and edges without stretching or lifting at the corners.
If a small bubble remains, gently lift the edge of the sticker, release the air, and press back down, rather than trying to slide the bubble to the side.
Trimming Edges and Handling Tough Spots
After the vinyl sticker is smooth, trim any excess with a sharp hobby knife or a precision cutting tool, holding the blade at a shallow angle to avoid cutting into the surface.
On textured walls, bumpers, or uneven car panels, use a heat gun on low setting to soften the vinyl slightly, allowing it to stretch and conform without cracking.

Pay extra attention to corners and seams, pressing them firmly and, if needed, applying a bit more pressure with the squeegee to ensure long-lasting adhesion.
Removing the Transfer Tape Without Damage
When the sticker is fully smoothed, slowly peel away the transfer tape at a sharp angle, as if you are peeling off a very thin layer of paint.
If part of the vinyl starts to lift, press it back down with the squeegee and slow the peeling speed, because rushing can cause tearing or incomplete adhesion.
For very detailed stickers with small pieces, remove the tape piece by piece, gently holding down each section of vinyl with your free hand.
Post-Application Care and Longevity Tips
After applying vinyl stickers, wait at least twenty four hours before washing or exposing them to heavy rain, so the adhesive can cure properly.
Clean the surface with a soft cloth and mild cleaner, avoiding harsh solvents or abrasive pads that could lift the edges or cloud the vinyl.
Over time, check the edges and press any lifted corners back down, because early intervention prevents full peeling and keeps the sticker looking fresh.
Common Mistakes and How to Avoid Them
One of the most frequent errors is applying stickers in cold or dusty conditions, which weakens the bond and invites particles to become trapped underneath.

Stretching the vinyl too hard during placement can distort the design, so reposition with care and prefer slow, gradual movement to a perfect fit.
Skipping the cleaning step, using dirty tools, or ignoring tiny bubbles almost always leads to peeling later, so invest time upfront for a flawless result.
When you follow these steps for applying vinyl stickers, the result is a clean, vibrant look that stays intact through sun, rain, and everyday wear.
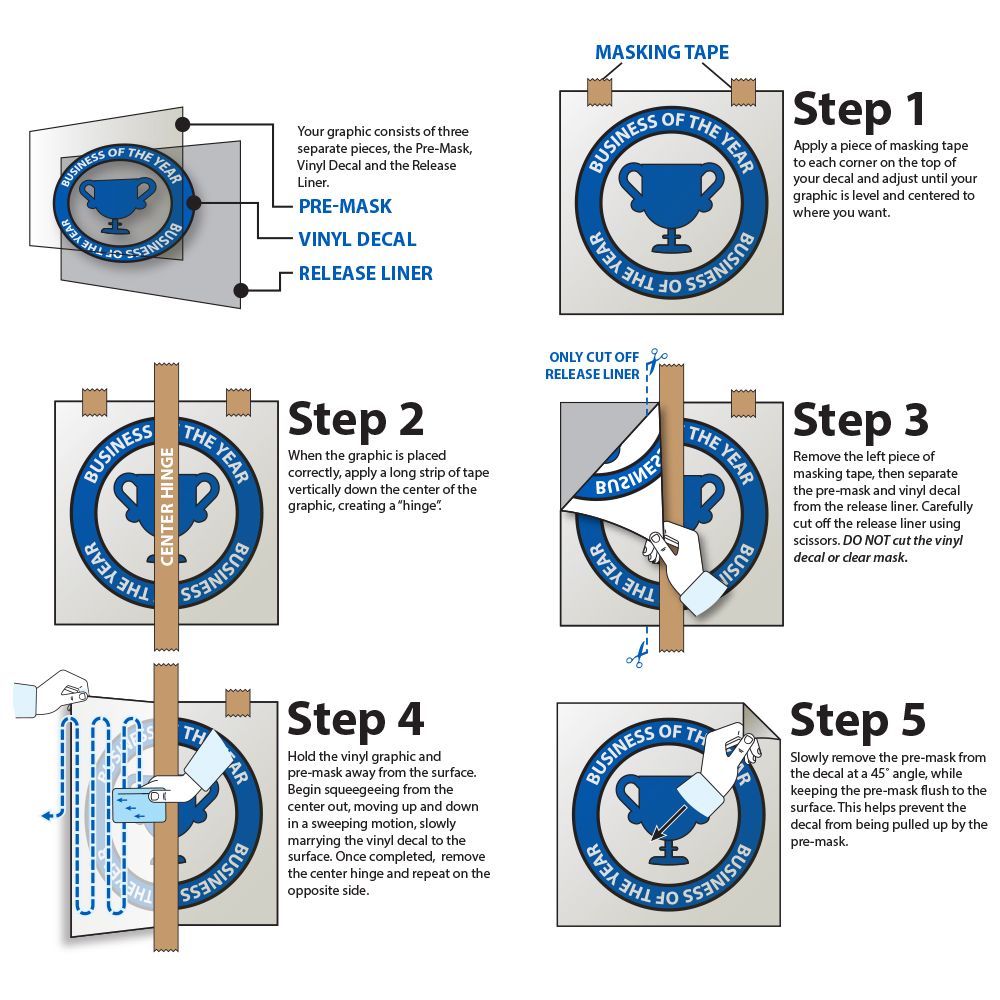
Apply Vinyl Decals using the Wet Application Method
How to apply vinyl decals using the Wet Application method. This method of vinyl adhesive application allows you to remove air ...
